Table of Contents
- Overview
- Dynamic Luminance Detection
- Variable Patch Targets
- Special Averaging Support
- Measurement Smoothing
- Falses Correction
- Start Points
- Channel Curve Smoothing Tutorial
- Variable Ink Limiting
- Target Luminance Calibration
- Contrast Tweaking
- Channel Remapping
- Curve Blending
- Curve Inversion
- Save a Copy
- Physical Ink Mixing and Blending
- Repurposing Clogged Printers
- Ink Placement Charts
- Initial Fill Instructions
- 1400/1430/1500 Instructions
- P400/R1900/R2000 Instructions
- R3000/P600 Instructions
- 3800/3880/P800 Instructions
- 4000 Instructions
- 4800/4880 Instructions
- 4900 Instructions
- 7600/9600 Instructions
- 7800/9800 7880/9880 Instructions
- 7890/9890 Instructions
- 7900/9900 Instructions
- P6000/P8000 Instructions
- P7000/P9000 Instructions
Piezography Manual
Printing
Pre-Print Nozzle Check
Before clicking the Print button you need to make certain that your printer is in great operating condition. Great is better than good. Piezography is very sensitive. Everything about it tends to reveal more deficiencies. It really requires a printer in peak operating condition.
Nozzle check is the easiest procedure to run in order to determine if you have any printing condition that might waste an expensive sheet of paper. It takes less than a minute and can be done on inexpensive copy paper. You should not run the auto nozzle check, but rather the manual nozzle check. It produces a nozzle check that looks like this:
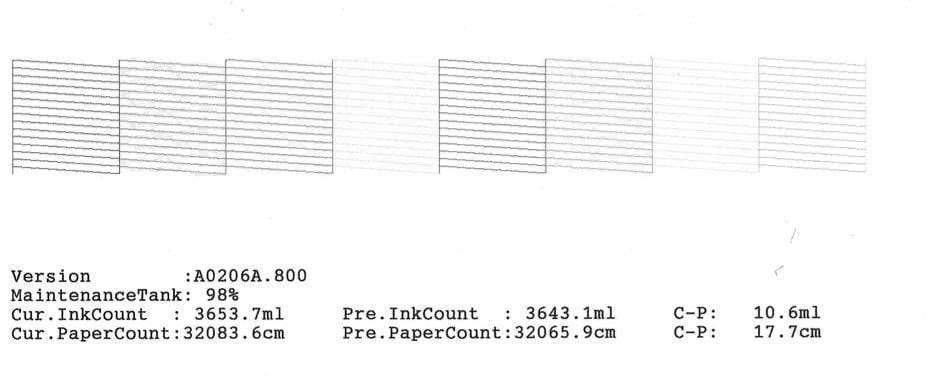
This simple test will tell you if you have a missing nozzle (will produce banding), have a missing ink (will look awful), have dirty nozzles (may produce banding or blobs). This is the stuff that ruins an expensive print. The print heads are affected by humidity, condition of the inks and dampers, and the cleanliness of the capping and cleaning station. We think that it’s a good idea to start the day off with a nozzle check and again every two hours or so. At some point you will get an idea of how often you can go without one.
One of the things that are most often overlooked is in reading the nozzle check itself. It is true that every single nozzle must print. There can be no gaps. However, a nozzle that prints below or above its step is the same if not worse than a missing nozzle. This particular jet will then overprint other dots and produce dark and light banding at the same time.
Each line represents a single nozzle. Each nozzle must print a line that subsequently steps down. Missing, or too low, or too high is all the same! The head needs cleaning! Do not attempt to make a print with a missing nozzle.
If you have recurrent missing nozzles - pay attention to your room humidity. 35% is minimum requirement to keep an Epson head moist.
Paper Pre-Check
Paper that is in cut sheets is often linty (needs careful brushing or blowing) and is often curled (needs careful bending). Both of these conditions will affect printing.
Paper lint if present, can be printed over with ink and will appear unnoticeable until the lint dislodges and a white paper spot appears on the print. These can be carefully spotted.
Paper that is curling inwards due to coating and low humidity is of great concern because it can cause a head-strike. If it makes even just a light contact with the print head, it can dislodge ink onto the sheet. The paper should carefully be bent backwards without causing harm to the sheet. The idea is that the paper should lay flat in the printer.
Finally, are you printing on the correct side of the paper. If the paper is an inkjet paper it is pre-coated. The coating is difficult to detect but there is an easy test. Just slightly moisten your finger and thumb and grasp a sheet. Hold it up and let go. The paper side that sticks to your finger or thumb is the coated side. You can also just barely touch the tip of your tongue to the paper and your tongue will stick to the coated side.
Printer Cleanliness
This should go without saying. The printer is a very complex machine and yet most people spend more time cleaning their coffee maker (knowing it will improve the coffee!) Your capping and cleaning station, as well as the wiper blade must be kept clean. We consider this a no less than every six months routine! Ink dampers in large format printers are supposed to be changed annually. In any event, keep your printer in peak condition.
Inks Conditioning
If you have not used your printer recently, the inks may need shaking. Epson states clearly that inks that have not been used up within six months of opening should be discarded. However, most of our customers use Piezography inks for up to two years.
If your inks have been sitting in the printer unused for more than three weeks, they will begin settling. This will cause ink of an unexpected density to begin working its way through the printer. If you experience posterization in the output - you should freshen the inks by gently shaking the carts and running enough Power Cleans or an Initial Ink Charge to move the stale ink out of the printer. This is a problem more prevalent on large format printers than small format printers.
Mac OS X Printing Cheat Sheet for K7/K6/P2
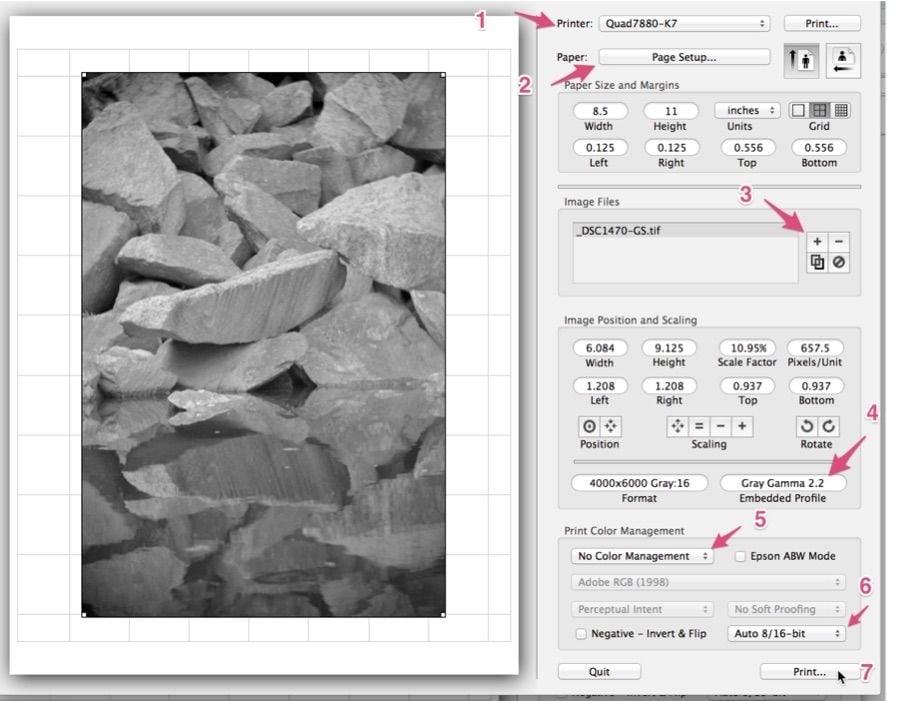
Launch Print-Tool if it is not already open.
-
Select available Quad printer from the Printer menu.
-
Select Paper Page Setup for the available Quad Printer.
-
Open an image/s and place or arrange on layout. You can drag or resize within the layout. Use the Position and Scaling and Rotate tools if desired.
-
Double triple check for the following Embedded Profiles: Gamma 2.2 or Adobe RGB (1998). If neither is present - do not proceed. You will need to reopen the image/s (check each) and convert and Save them with the correct Embedded Profile.
-
Double triple check that No Color Management is selected from the Print Color Management menu.
-
Choose Auto 8/16 bit from the Printer Color Management menu.
-
Click Print to print to the QuadTone RIP
-
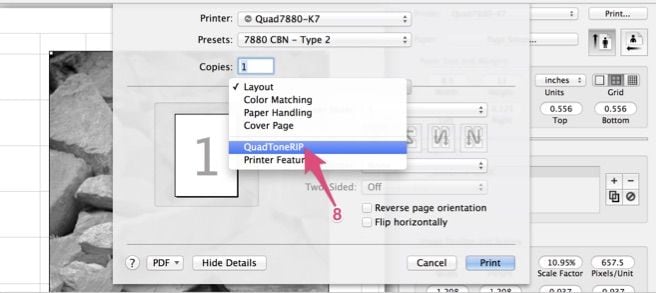
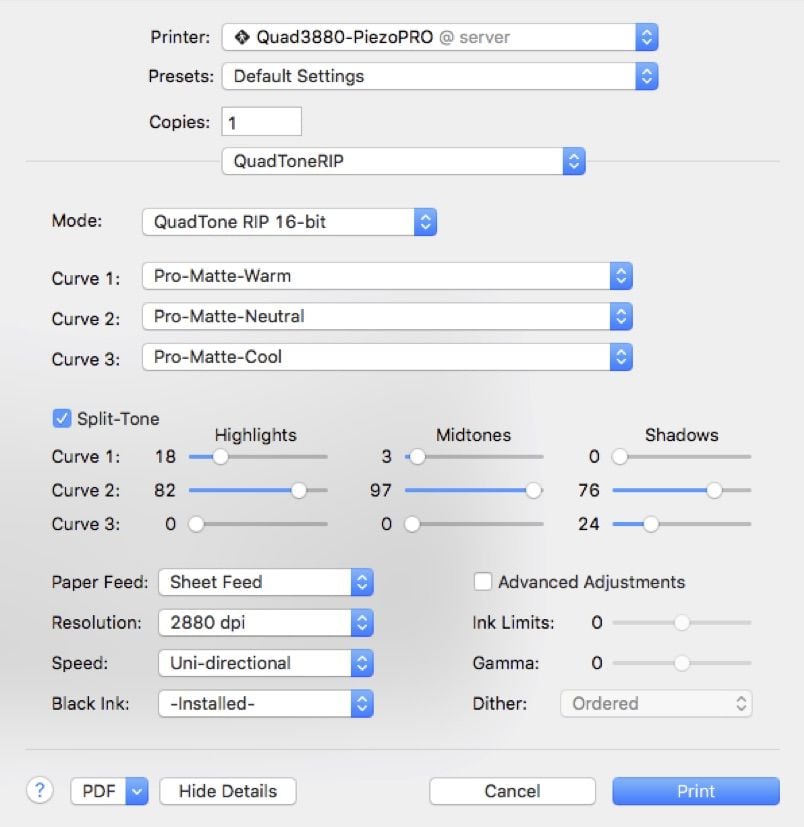
Select QuadToneRIP from the Layout menu.
-
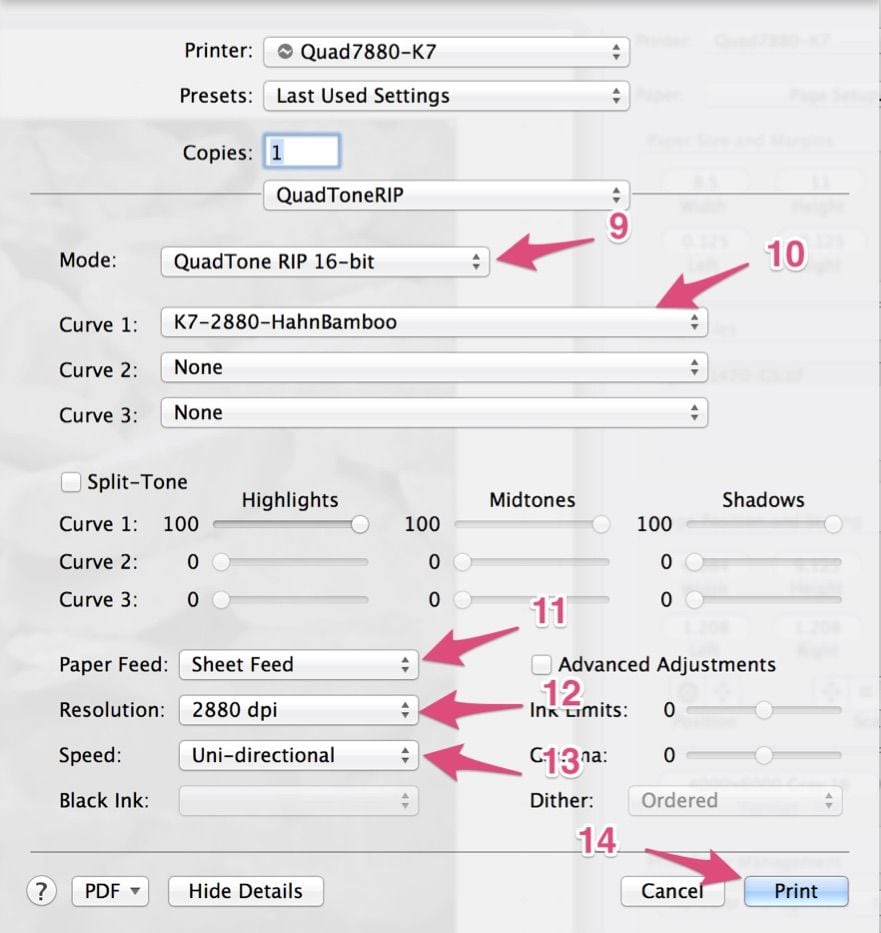
Select QuadTone RIP 16-bit or 8-bit from Mode menu.
-
Select the correct Piezography Curve for the media you are printing (select “none” in the other two curve pull down lists)
-
Select the correct Paper Feed for the available Quad printer model.
-
Select 2880 dpi under the Resolution menu.
-
Select Uni-Directional for highest quality printing with the Speed menu.
-
Click Print to print. DO NOT TOUCH ADVANCED ADJUSTMENTS!
Mac OS X Printing with Piezography PRO
The beginning steps of printing with Piezography Pro are the same as with other all Piezography systems, but the difference is the curve selection in QuadTone RIP. Instead of selecting just one media curve as you do with Piezography K7/K6/P2, you select THREE curves with Piezography Pro, and use QTR sliders to blend the curves. For each paper, we provide three curves: Neutral, Warm and Cool.
First, select the “Warm”, “Cool” and “Neutral” curves for your media in the QTR curve pull down lists. Check “Split-Tone” to move the three sliders independently, otherwise the sliders will move together equally.
We recommend starting with a neutral base, by moving the curve slider that corresponds with the neutral curve to 100%, as shown below.

Now, add warm or cool tone by moving the curve sliders that correspond with the warm and cool curves, to add tone to the highlights, midtones and shadows. The possibilities are endless, and allow for the user to get a very wide range of tonal output with just one ink set.
When selecting glossy media curves with Piezography PRO, the Gloss Optimizer is printed at the same time as inks for single-pass gloss printing.
Windows Printing Cheat Sheet for K7/K6/P2
Launch QTRgui from the Start menu if it is not already open.
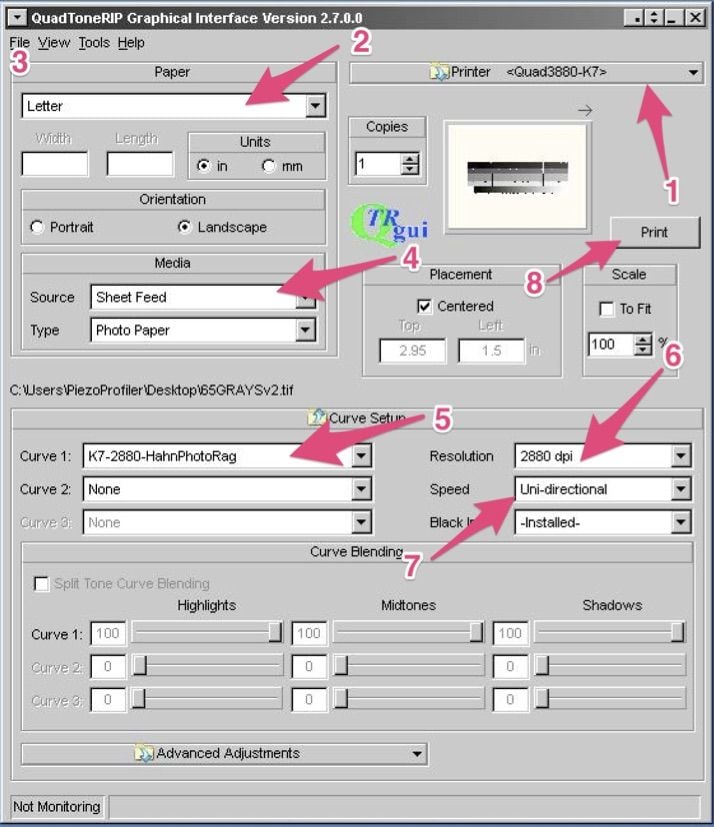
1. Select available Quad Printer from the Printer menu.
Click Print to print. DO NOT TOUCH ADVANCED ADJUSTMENTS!
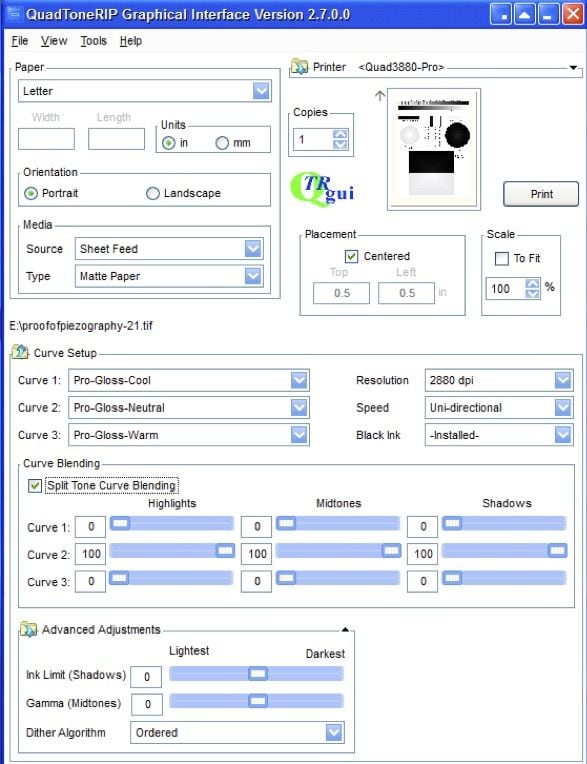
Windows Printing with Piezography PRO
We recommend starting with a neutral base, by moving the curve slider that corresponds with the neutral curve to 100%, as shown below.

Drying the Print
Glossy and Baryta Printing (K7/K6/P2)
Confirm that the paper page setup is the exact same size as when the image was first printed. This is critical.