Table of Contents
- Overview
- Dynamic Luminance Detection
- Variable Patch Targets
- Special Averaging Support
- Measurement Smoothing
- Falses Correction
- Start Points
- Channel Curve Smoothing Tutorial
- Variable Ink Limiting
- Target Luminance Calibration
- Contrast Tweaking
- Channel Remapping
- Curve Blending
- Curve Inversion
- Save a Copy
- Physical Ink Mixing and Blending
- Repurposing Clogged Printers
- Ink Placement Charts
- Initial Fill Instructions
- 1400/1430/1500 Instructions
- P400/R1900/R2000 Instructions
- R3000/P600 Instructions
- 3800/3880/P800 Instructions
- 4000 Instructions
- 4800/4880 Instructions
- 4900 Instructions
- 7600/9600 Instructions
- 7800/9800 7880/9880 Instructions
- 7890/9890 Instructions
- 7900/9900 Instructions
- P6000/P8000 Instructions
- P7000/P9000 Instructions
Piezography Manual
PiezoDN and The Digital Negative
Overview
The Piezography PiezoDN system makes perfectly matched screen-to-print digital negatives for any alternative process. Utilizing shades 1-6 of monochrome Piezography ink, PiezoDN increases the defined resolution of the negative over other inking systems attaining a true contact-sheet-level resolving power. Because the ink is monochrome, PiezoDN acts like silver-based film and has predictable, stable ultraviolet and panchromatic exposure properties that follow in lockstep with 120 years of traditional photography. There is no guessing-in-the-dark with this system. There is no need to build custom Photoshop calibration curves or to even invert the image before printing.
PiezoDN is a collection of expert inks, tools, and techniques that have come together to create a digital “WORKFLOW.” The “PiezoDN Workflow” enables you to print in the analogue darkroom at a level of quality far-surpassing anything that has come before in digital negative printing and in many cases surpassing what has been possible in the entire history of darkroom printing. Like all workflows, the devil is in the details. While this process is certainly capable of producing the best negative ever created, if it is improperly followed, that won’t happen.
What ISN’T PiezoDN?
To define what PiezoDN is we must explain what it isn’t. PiezoDN is not a how-to guide for alt-process printing. In this documentation we don’t tell you how to print in the darkroom. PiezoDN is not all packaged in a neat bow but is a set of tools and files that come together with a set of required software and ink to make one whole family. PiezoDN is not meant for total darkroom beginners! PiezoDN is also not a Photoshop tutorial or guide for adjusting images. We don’t cover these things but many other people do with much more detail.
Why did we create PiezoDN?
Up to this point, darkroom printing has always been limited by the chemical constraints of the medium. This is a blessing and a curse. Contrast has been controlled by an intricate dance of zone-system work and choices of developer and paper. Artists will master only a few ways of printing over their entire careers. When inkjet printers arrived and Piezography was launched, monochrome printing became vastly more controllable. This heralded a disruption in artistic practice for millions of people. Suddenly an artist could get exactly the tones they wanted in their print and they could reprint those exact tones time and time again. Inkjet material choices have expanded exponentially over the years and this new way of working has become the default.
There are weaknesses to inkjet printing however. Inkjet papers must be coated with a receptive layer and this adds real complexity and fragility to the process not to mention a problem with archival storage. Many of these inkjet papers are so susceptible to pollution that they can yellow when improperly mounted or stored near sulfur! Real care must be taken to ensure these prints stick around for hundreds of years. When emulsion is embedded in an analogue darkroom paper, visual clarity, durability, and archival qualities are enhanced ten-fold.
The problem with other leading digital negative solutions is they have never really lived up to the “Piezography” name. Piezography is a method for making prints with full tonal separation, extremely fine detail greater than the printer can produce with its own OEM ink, and limitless flexibility with different papers and substrates. To date, other negative systems have not really lived up to that high bar, so we decided to make PiezoDN ourselves.
PiezoDN combines the best of both worlds. It has the flexibility, resolution, and tonal range of Piezography with the archival, embedded, subtle, luxurious qualities of analogue printing. It is truly the pinnacle of monochrome printmaking made real.
How is PiezoDN different than Precision Digital Negative?
PiezoDN is built only for Piezography micro-encapsulated monochrome ink printing. Using truly monochrome ink that is gloss-compatible simplifies the process of creating and calibrating digital negatives for any process and also enables truly fine-tuned linearization that has way more data-points than what a Photoshop ACV curve allows. The goal of PiezoDN is to liberate the image and embed the entire calibration into the print-system itself instead of the Photoshop file. That said, PDN is 100% compatible with the underlying PiezoDN system. If you are familiar with PDN and want to simply use the stock PiezoDN curves and Piezography ink, go for it! We aren’t stopping anyone from using PDN, we just think that the PiezoDN calibration is slightly more refined at this point because it is able to utilize true 16bit workflows without limiting image data in Photoshop.
Requirements and Installation
The workflow and its documentation assume that the practitioner has some background in darkroom printing and analogue process control. There is a certain investment required to fully appreciate the vast tonal range and fidelity PiezoDN allows. One must have a darkroom and attendant chemicals and paper they are happy with. They must have a computer and a compatible Epson professional inkjet printer. They must have OHP UltraPremium Pictorico inkjet film. They must have the time set aside to truly learn the workflow and terminology and ethos found in the following pages.
Alongside general darkroom knowledge requirements, it’s important that a person using PiezoDN be familiar with QuadtoneRIP and the general Piezography workflow. The best way to learn this is to fully read and learn The Piezography Manual included with this PiezoDN distribution and found in /Applications/Piezography/Documentation/!
Film Media
This system is predicated on the use of Pictorico OHP UltraPremium film. No matter what anyone tells you, there is simply no substitute for Pictorico OHP Ultra. It alone can absorb all of the ink that PiezoDN uses when it prints. Those making digital negatives with color ink do not actually print very much ink at all and they can use any film. Piezography requires Pictorico OHP Ultra because its unique coating is the only film coating that can absorb the ink load!
Alt-Process Paper
Alt-Process photo paper for Platinum and Palladium and other hand-applied emulsions comes in a few different levels of quality. In theory, you can use just about any un-coated paper for coating. However, processes like Palladium, Platinum, and Ziatype all require pure paper that is not polluted by our modern environment and has certain characteristics in water absorbency that make a perfect substrate for coating and printing. We have four favorites at Cone Editions: Hahnemuhle Platinum Rag, Bergger Cot320, Arches Platine, and Legion Revere. These four papers are extremely high quality, mold-made, alt-process papers that will perform well for any hand-coated process.
For more traditional silver-gelatin printing, we calibrate against standard Ilford MultiGrade IV fiber gloss paper using Sprint print developer mixed 1-9. This is the MOST standard workflow but after getting good results with ILF-MG paper, you can certainly experiment! Bergger silver-gelatin paper is much more luxurious than Ilford. And if you have some boxes of FORTE in your freezer still, use that too!
Supported Processes This system comes with pre-defined curves and default ICC Profiles for Platinum printing as well as curves for Gum, Ziatype, Salt, Cyanotype, and Silver. Not all printers have all the processes but every PiezoDN printer has a MASTER curve that can be calibrated for any process.
Use A Modern Epson Piezography Printer
For an up-to-date list of supported printers see this web page: https://piezography.com/choose-piezography-printers
Use the RIGHT Piezography ink first if you are just starting out.
The PiezoDN system was initially built on top of the Piezography Selenium ink set. We chose this ink set because we’ve been doing the classic “Piezography Digital Negative” printing with it for almost a half decade and we know that it has stable Ultraviolet exposure from ink-batch to ink-batch. We don’t want to rock the boat too much.
But now most of our work with PiezoDN is being done with the Piezography Pro ink set. We can say that the best negatives we are producing at this point are with the Piezography Pro inks. Far more of our research and intentions for more product release are based on the Pro inks.
To use PiezoDN you need either the Piezography Pro ink set or the Piezography HD PK (High Density Photo Black), and Selenium shades 2 through 6. If you are printing on anything other than the 1430 printer, you also may want the Gloss Optimizer. The Gloss Optimizer hardens the film and keeps it from getting scratched when you expose! We've made this easier for you by including all of our PiezoDN Ready products here - and you can filter it further by Printer Model or Product Type.
QuadtoneRIP and Print-Tool
Just like normal Piezography printing, PiezoDN requires QuadtoneRIP to be installed. This little software is described in detail elsewhere in this manual and it’s AWESOME. In addition to QuadtoneRIP, PiezoDN requires Print-Tool on the Mac. This application is used to lay-out images and can print with the unique ICC profiles built for the PiezoDN process. Both QuadtoneRIP and Print-Tool can be bought and downloaded from www.quadtonerip.com. They cost about as much as a few sheets of Platinum paper! Very affordable.
Chemicals
Alt-process printing is a very hands-on process and is often unique to every artist. That is the beauty of it and it’s why we have spent so much time and energy making such a cool system for it! However, the base PiezoDN calibration curves (.quads) are built for specific chemical ratios. Chances are you will have a different type of chemical ration, humidity, exposure booth, etc in your darkroom. That means that you will most likely have a different contrast than what the original ink curve was calibrated for. You will need a spectrophotometer in order to properly calibrate for you specific darkroom conditions.
Modifying Your Printer for Film Printing
Inkjet printing negatives can be difficult. Inkjet printers are built for printing positives on inkjet paper not negatives on inkjet film! The one type of film that works perfectly for negative printing is Pictorico OHP UltraPremium, however this film is very fragile. Inkjet printers have small “star wheels” that keep the print from skewing as it leaves the printer and these metal wheels can make annoying marks on the film that show up in the print. There are many ways to get rid of these star-wheel marks and the general approach is to make the star-wheels not physically touch the film.
First the good news. All wide-format printers don’t have star-wheels. Any printer that is 24” inches or over will not mess up your film. You put the sheet of film in the printer and print. Bada-boom.
Now the bad news. Just about EVERY SINGLE small format printer (17” wide on down) will mark your film and there are different ways that you have to modify each type of printer to get rid of the star wheels.
Read the “Getting Started Guide for PiezoDN.pdf” that installs with PiezoDN for more information.
Calibrating PiezoDN
At first glance, the PiezoDN workflow can seem very complicated. However, after the first few go-arounds it becomes just like riding a bicycle. Once you’ve calibrated for a given process (say silver printing on Multigrade IV in Dektol developer) you don’t have to repeat the calibration process for long time. Creating tonally-controlled darkroom prints becomes easy and predictable and fast.
One major difference between calibration of PiezoDN and calibration of other darkroom or dig-neg processes is that PiezoDN is always calibrated against the print using Luminance values (see terms below). This can be very confusing for old-hands that are used to the zone-system because the zone-system uses density values instead of Luminance values. If you have done calibration of negatives with density values in the past read this article very carefully because it will be DIFFERENT than what you are used to. You may have to un-learn some habits.
Calibration Terms
Many people don’t know some basic terminology that is required when communicating and teaching and learning this new system. In this chapter we’ll explain a few of the required systems and approaches the best we can.
Spectrophotometers & Luminance: A spectrophotometer is a device that can shine a controlled amount of light against a small area of paper on a print and read the exact color and intensity of light reflected back. This light is measured in “Luminance” (otherwise called L*) which is the percentage of light reflected. L*0 would be the blackest black ever known and L*100 would be the whitest white. Photographers use spectrophotometers to calibrate their prints and we have built the PiezoDN calibration system around these tools.
There are varying levels of spectrophotometers from very “cheap” ones in the $300-$450 range, to mid-tier in the $1200.00 range all the way up to high-end in the $5,000-$20,000 range. PiezoDN can work with all of these devices and in-fact the cheaper ones seem just as good as the mid-level ones. One cheaper option that works well is the SpyderPrint system from Datacolor (datacolor.com). Another one (that we use in-lab at InkjetMall) is the i1Pro2 from Xrite (xrite.com).
Film Densitometers : Densitometers are very different than Spectrophotometers. They read the “transmissive” density of film and some can read this density in “optical” (human perceptible) light and “uv” (ultraviolet) light. In the past, these densitometers have been the way that technicians and artists calibrated their film. Even the zone-system utilizes densities plotted with transmissive densitometers. However, PiezoDN is able to calibrate the film with much more accuracy for any emulsion (UV or optical sensitive) when a target negative is printed in the darkroom and the reflective densities are read with a spectrophotometer.
There are ways to calibrate PiezoDN negs with film densitometers but we do not officially support those procedures yet. Most likely there would need to be a significant investment in a $4-grand level automated film densitometer to do this correctly and at the same level of fidelity one is able to achieve with a $400.00 spectrophotometer.
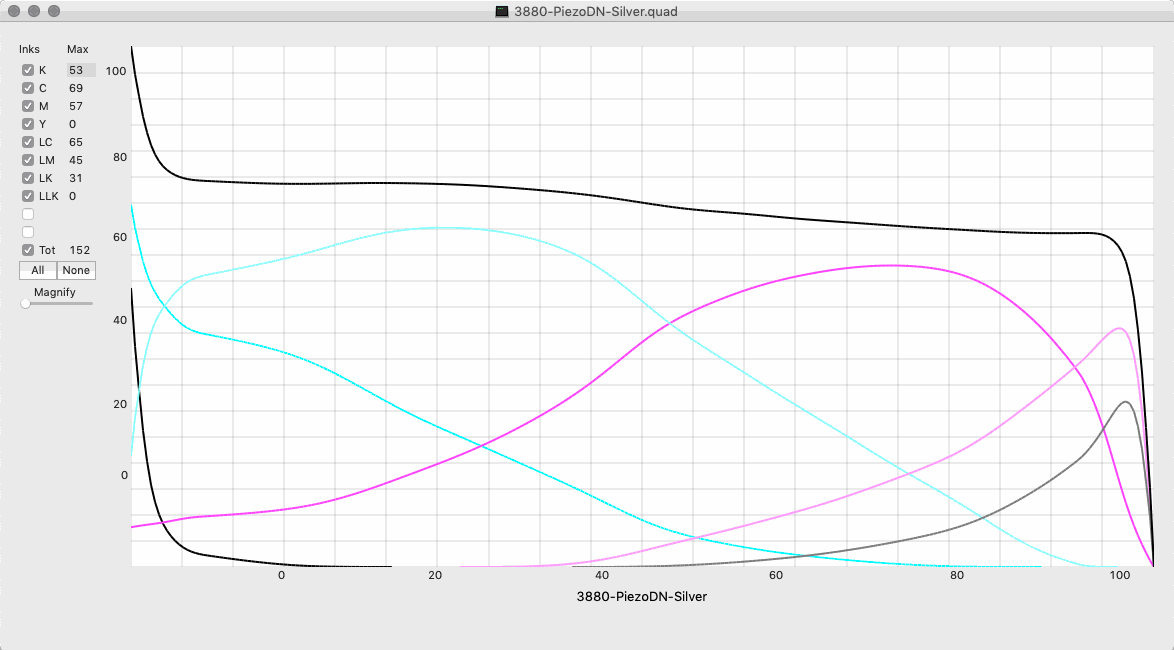
QTR “CURVE/PROFILE” .quad Files: The “.quad” file is actually a txt file with a few thousand individual numbers in it. These number correspond to specific ink channels and tonal densities that MAP how each tone in an image gets printed on the printer using Piezography ink. Sometimes these .quad files are called “curves” (even though they are actually a series of up to 10 curves per .quad) and sometimes they are called “profiles” (even though ICC profiles really should be the only thing called profiled). We call these things “curves” and “.quads”. They are the underlying engine that calibrates Piezography for either a print or negative. Long descriptions are available in the “Advanced Techniques” section of this manual.
CGATS file format & QTR .txt files : Many people who make their own profiles or QuadtoneRIP curves have come across the CGATS txt file format. CGATS is an acronym that stands for “Committee for Graphic Arts Technology Standards” and it’s essentially a way to describe color data collected by a spectrophotometer. QuadtoneRIP reads CGATS data when it linearizes .quads or builds ICCs and all of the applications that come with the various Spectrophotometers support this file format be default. It’s an industry standard!
Linearization: Linearization simple stands for making the tonal values from dark to light become equal in distance to each-other. A properly linearized environment will make a monitor image look just about like the printed image. PiezoDN is essentially a tool to “linearize” the darkroom. It’s “darkroom V2.”
Grayscale ICC Profiles: There’s a little tool called QTR-Create-ICC that lives in the QuadtoneRIP folder. This little tool makes actual grayscale icc profiles. When you PRINT with one of these files it acts like a very precise Photoshop curve that, by default, tunes the final print to have slightly darker shadows in order to more accurately match the final print to your monitor’s contrast.
PiezoDN uses grayscale ICC profiles to control the myriad different contrasts that alt-process printing presents. Instead of having to calibrate your monitor to each contrast, why not calibrate the different prints to the industry-standard contrast of your monitor? That way one print on one media will have the same visual contrast as another using a different process but the same file!
Calibration Overview
Once the darkroom and printer and inks are all set up, the PiezoDN Calibration Process has a few straight-forward steps.
-
A darkroom process (silver, platinum, cyanotype, etc) is chosen and the appropriate .quad “curve” is chosen or limited to begin the calibration process.
-
A 129 step target negative is inkjet printed and then darkroom printed.
-
This 129 step darkroom print is read in with a spectrophotometer and used to “linearize” the chosen .quad.
-
(Optinal) Another 129 step negative is inkjet printed with the linearized .quad & then darkroom printed. This second 129 step print is read in with a spectrophotometer and used to create an ICC.
-
The linearized .quad and ICC are used together to print perfectly calibrated digital negatives for the chosen darkroom process.
Initial .quad Choices and Limiting
The most crucial step in this whole workflow is finding the correct .quad for your given process. These .quad files that make up the base of the PiezoDN system are the calibration files that tell the printer how much of each shade of ink to print for each tone of the negative. If the .quad is putting down too much ink in the dense parts of the negative (highlights of the darkroom print), the highlight area becomes totally blown out and the target would be un-usable for linearizing. This can happen if you are using a unique darkroom process that we haven’t fully R&D’d at inkjetmall.
You have two choices when getting the right starting .quad. One choice is to use one of the highly specific .quads we’ve created for a given process. Let’s say you are printing Palladium. Well, PiezoDN has a curve that is built for Palladium printing (it’s called PtPd) so you should start your calibration process with that .quad. The second choice is to use the “master” .quad that comes with each PiezoDN printer and then limit that for your given density requirements. This second path is chosen when calibrating for wildly different processes.
Option A, Using a pre-calibrated PiezoDN .quad:
This is easy. Sometimes if you choose this, you’ll find out you can skip the entire calibration process and just print! Choose the .quad that you think will work the best for your process. If you are doing silver prints, find the .quad that is built for silver. If you are doing Platinum or Palladium, find the .quad that is built for Platinum or Palladium. You can find these quads by reading the ReadMe.pdf in each PiezoDN Curve folder.
After you have made your choice of pre-calibrated .quad you can skip the limiting procedure and go right to “Printing the 129 Step Linearizer Target”. If you need to limit a .quad, continue right here . . .
-
In the darkroom, take a clear piece of OHP UltraPremium film and find the minimum exposure time for making maximum black by placing the film over your paper and doing a series of increasing exposures like you would a normal darkroom test-strip.
-
Find the master .quad installed in your PiezoDN printer folder. Eg: 4900-PiezoDN-Master.quad. Alternatively you can use any PiezoDN.quad that you think will work.
-
Inkjet print the “LIMITER” target file on film with the .quad to make a new negative. The LIMITER target file is at /Applications/Piezography/Images/PiezoDN_Targets/LIMITER.TIF
-
To print this target file (or any target file for PiezoDN) you need to drag it into Print-Tool, make sure “no color management” is selected at the bottom right, hit print, and then select the right printer. Then you need to make sure you select the correct QuadtoneRIP curve (there are detailed instructions on this in other sections of this entire manual). In this case, the quad curve you will be printing with is what you’ve chosen in step “b” above.
-
Hair-dry this negative for a few minutes on high and then let it sit for a few minutes.
-
Take the LIMITER negative and contact print it with the exposure amount from the first step.
-
After this target print has been washed and dried, look at it. Each step square is separated by white. This enables you too find the first patch that is slightly less that white be seeing if it is visibly different than the white separating line. If this patch is #255 or #254 than you are ok and you don’t need to limit. If you see this farther down line at say #240, than you need to limit.
-
To find the correct limit # find the first patch that has a little tone in it. Look at the row value directly to the right of this patch and subtract the column number found directly to the bottom of this patch. Then SUBTRACT ANOTHER 4 from this number. That will be your LIMIT NUMBER.
-
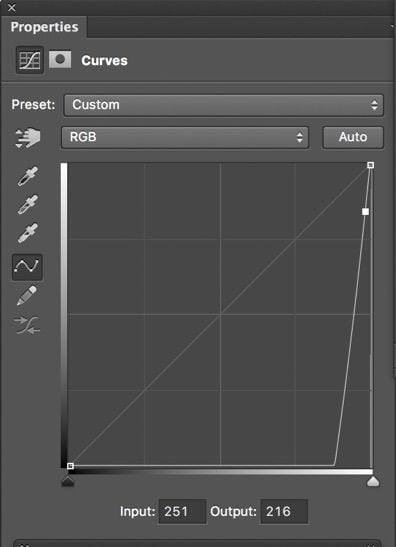
Open a new blank file in Photoshop and add a curve layer.
-
With the curve adjustment open, create a new datapoint. Set the INPUT to 251 and the OUTPUT to the LIMIT number. For the sake of the instructions we’re going with a LIMIT number of 216 . . . .
-
Now slope this curve evenly back to the line using only 3 more data points as demonstrated below. Just make sure you don’t change the datapoint at 251/216.
-
In this curve example we have four data points (not including 0,0 and 255,255). They are as follows: 153,121 238,193 247,203 and 251,216
-
Next, open the PIEZOGRAPHY_CURVE_ADJUSTMENT.xlsb Excel tool (yes, you need Excel installed, it won’t work with anything else.).
-
Paste these input and output values in so the curve here looks the same as in Photoshop.

-
Go to the “CGATS” sheet in this tool and copy/paste its contents into a new spreadsheet.
-
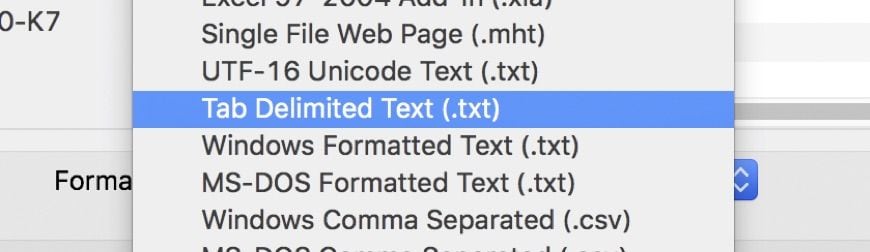
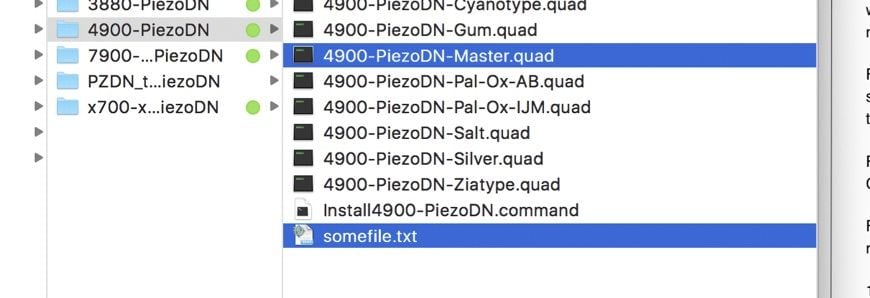
Save the new spreadsheet as a Tab Delimited .txt file (somefile.txt) in the same folder as your master .quad that you printed the LIMITER.tif with eg: 4900-PiezoDN-Master.quad
-
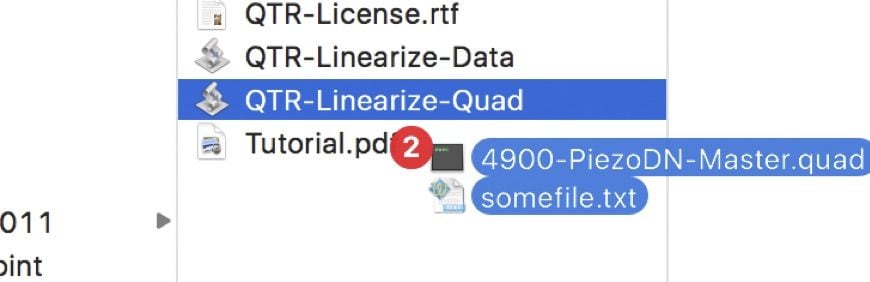
Select both your master .quad you would like to limit and "somefile.txt" 
-
Drag both these files together over the QTR-Linearize-Quad droplet and a new .quad will be created eg: 4900-PiezoDN-Master-lin.quad

-
At this point you can name the new .quad with some more specific information eg: 4900-PiezoDN-Gravure-limited.quad

-
Double click the Install command to install the new .quad
-
Now you have a limited .quad that you can print with! Continue to the next step of the PiezoDN Calibration Process.
Printing the 129 Step Target
Linearizing from a 129 step target really requires a spectrophotometer to be done perfectly. On the cheap side, the Datacolor SpyderPRINT(datacolor.com) works well. The i1Pro and i1Pro2 (xrite.com) work too. A good flatbed scanner can also work ok for this but if you are doing that you need to go to the “Alternative Calibration Workflows” section.
Find the target that works for your spectrophotometer. The most supported “industry-standard” way to do this is with the i1Pro Spectro and ColorPort software. All of the targets are at /Piezography/Images/Piezography/
Follow and read the documentation for your given software whether that be SpyderPrint, ColorPort, i1Profiler, or Colormunki *coming soon for colormunki.
For full how-to videos please visit our Youtube channel at youtube.com/inkjetmall (also coming soon). This is really the best way to learn how to do the steps listed below.
-
Print the 129 step target file using your .quad of choice (either a pre-calibrated .quad or a custom limited master .quad). You need to use Print-Tool for this. Make sure to select “no color management” at the bottom right before you print.
-
Dry the resulting negative with a hair dryer for 30 seconds and let sit while you get your darkroom ready.
-
In the darkroom, take a clear piece of OHP UltraPremium film and find the minimum exposure time for making maximum black.
-
Print the 129 step film at the this exposure time and wash/dry the print (dry naturally not with a hair-dryer). It’s very important to print the target negative with the appropriate amount of white-space. So don’t skimp on the sheet size!
Linearize the .Quad (Curve)
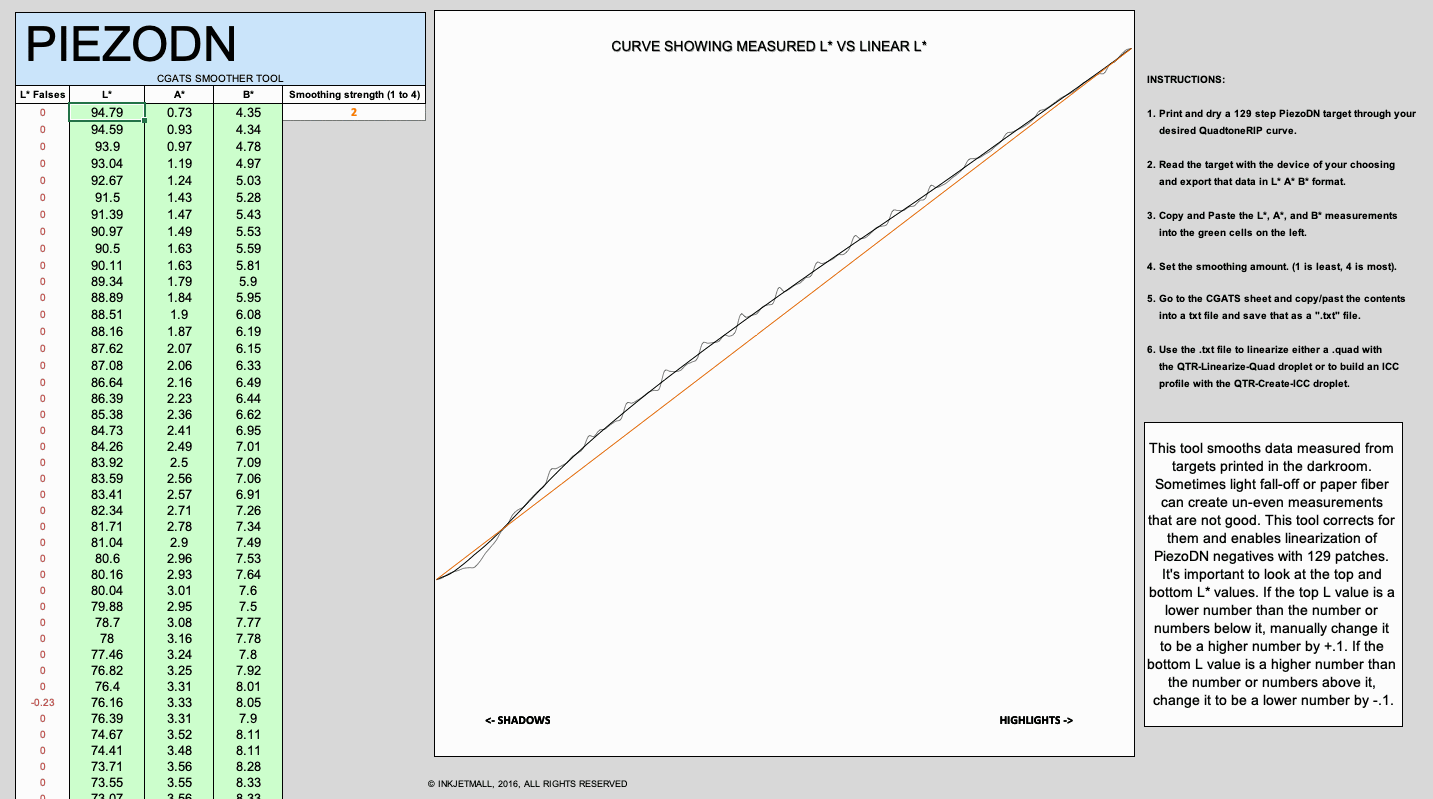
There are many ways to linearize .quads. Many people say that you only need 21 steps to linearize a .quad. Others say you need 21x4 steps to average out any errors that might crop up in the measurement. In our long history of linearizing .quads we have found a different approach that works better. We use 129 steps from dark to light and then average those steps together in a particular way to get rid of measurement errors created by light fall-off during the exposure or paper/emulsion issues. For PiezoDN this averaging is done in one way, and for Piezography inkjet “positive-prints-on-paper” the averaging is done in a different way. Follow the steps below for the PiezoDN workflow.
-
Take the washed and dried print from STEP 2 and read in the film densities with your spectro of choice! Note: It’s important that you actually know how to use your spectro and the software that comes with it. This manual does not tell you how to read in the measurements. In the /Piezography/Images/PiezoDN-Targets/ folder you will find targets and attendant workflows or descriptor files that each software requires to correctly read in the data. You must look at the documentation that comes with your profiling system to learn how to use these targets!
-
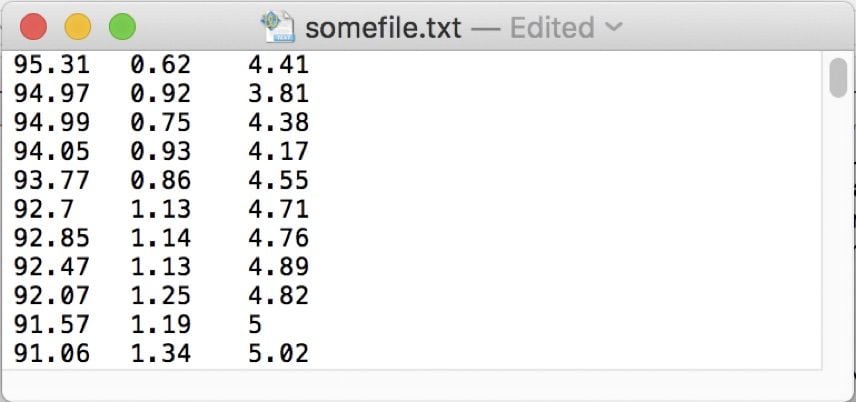
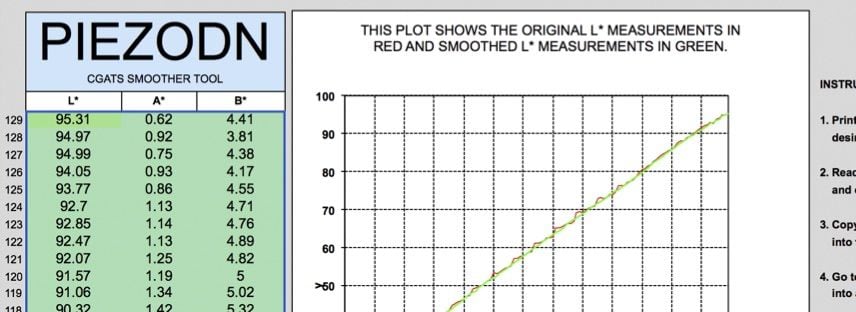
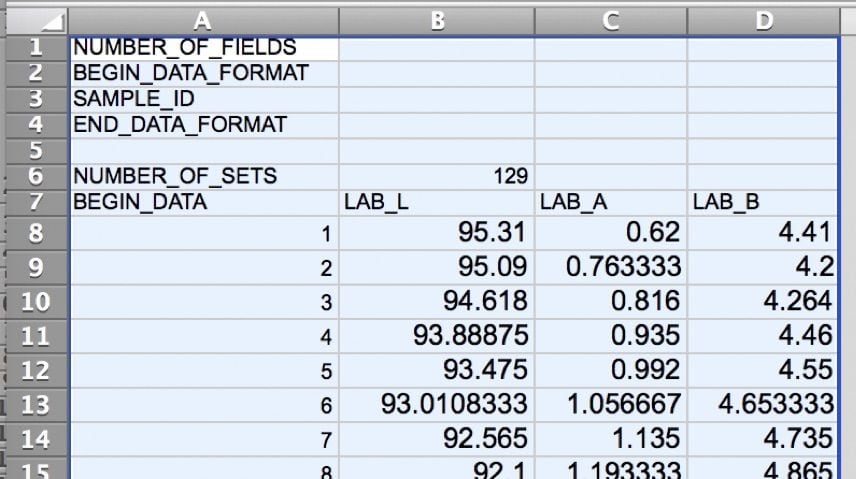
Save the densities as L*a*b* values in a .txt file format. That should look something like this (just 129 rows long). Left column is L*, middle is A*, and right is B*.
-
Open this .txt file and select-all and copy.
-
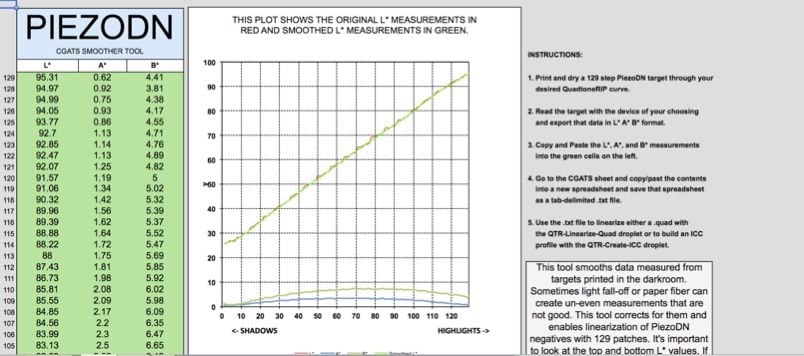
Open your 129STEP_PIEZODN_CGATS_SMOOTHER Excel tool (there is a Numbers version as well if you don’t have Excel).
-
Paste the 129 L*a*b* data into the green area and follow the instructions found on the right of this spreadsheet. This tool will smooth out any measurement errors that have come about from exposure falloff on the print, paper fibers, etc. See screenshot: 
-
As the instructions in this tool say, make sure there are no reversals in the top two L* numbers and bottom two L* numbers. Then go to the next sheet at the bottom called “CGATS” and copy/paste this data into a new spreadsheet (all the cells that have a white background):
-
Save the new spreadsheet as a tab delimited .txt file into the same location as your .quad that you printed the 129 step target.

-
Select both the .quad and the .txt file and drag these TWO files together over the QTR-Linearize-Quad droplet:

-
If everything was done correctly, the QTR-Linearize-Quad droplet will create a new .quad with the same name as the original quad but with “-lin” at the end.
-
Rename this “-lin” quad however you like and install it, eg: 4900-PiezoDN-Gravure-v1.quad
-
This new .quad is linearized meaning the darkroom prints you make from this new .quad will be tuned and the tonal gradations from dark to light will be aligned. However, not all darkroom processes have the dMax (black depth) of normal inkjet prints. Because of this, it’s often useful to build a final calibration file called an ICC PROFILE to match the darkroom print contrast to your monitor contrast. To do this, continue to step four.
Building ICC Profiles
The ICC profile tweak for PiezoDN simulates a higher-contrast in the final print. This is done to match the monitor when the darkroom process being calibrated (let’s say Palladium) is much lower-contrast than the monitor and when the desire of the artist is to match the darkroom prints to the monitor as close as possible. THIS IS AN ENTIRELY OPTIONAL calibration. With ONLY linearized .quad, a negative can be printed and then still printed successfully in the darkroom.
-
Print the same 129 step target file using your new linearized .quad
-
Print the 129 step film at the this exposure time and wash/dry the print (dry naturally not with a hair-dryer). It’s very important to print the target negative with the appropriate amount of white space. So don’t skimp on the sheet size!
-
Take the washed and dried print from STEP 2 and read in the film densities with your spectro of choice!
-
Save the densities as L*a*b* values in a .txt file format.
-
Open this .txt file and select all the numbers and copy.
-
Open your 129STEP_PIEZODN_CGATS_SMOOTHER Excel tool (there is a Numbers version as well if you don’t have Excel).
-
Paste the 129 L*a*b* data into the green area and follow the instructions found on the right of this spreadsheet. This tool will smooth out any measurement errors that have come about from exposure falloff on the print, paper fibers, etc.
-
As the instructions say, make sure there are no reversals in the top two L* numbers and bottom two L* numbers. Then go to the next sheet called “CGATS” and copy/paste this data into a new spreadsheet.
-
Save this new spreadsheet as a tab-delimited .txt file to the desktop.
-
Instead of dragging the measurement .txt + .quad directly over the QTR-Linearize-Quad droplet, instead drag just the new measurements .txt over the QTR-Create-ICC droplet!
-
An ICC profile with the name of the .txt file will be created.
-
Take this ICC profile and drag/drop it into /Applications/Piezography/ICCs/PiezoDN! To utilize the ICC magic select it in Print-Tool when printing your negatives!
-
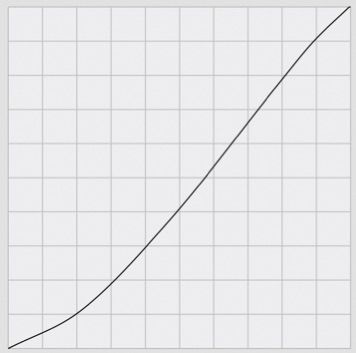
ICC profiles pull the tonal values of a Platinum/Palladium print down in the shadows like the image below.
-
NOTE: If you do not want to do the ICC step and you are printing with Platinum or Palladium you can simply print with the included PiezoDN_PtPd_Default ICC profile.
PRINT! PRINT! PRINT!
Now that you are done calibrating, it’s important to validate that everything is working properly. Select an image that you love to print and that you are very familiar with. Preferably this is an image that has a full tonal range from dark to light with fine gradations and subtle detail and contrast. Alternatively, this system is great to print a really difficult image with. Find an image that you just haven’t been able to print on other dig-neg systems and try it on this one.
Print this image as follows:
-
Open the image in Photoshop and size it to your desired print size. We suggest setting the output resolution to 720ppi. (If you are down-scaling to this resolution set the resample mode to “Bicubic Sharper” in Photoshop.
-
There is no need to “invert” the image tones with PiezoDN. (Many people are used to inverting the image when printing digital negatives. You don’t need to with PiezoDN.) However! You do need to do step 3.
-
Flip the image 180 degrees. (VERY IMPORTANT. WE PUT A STICKY ON THE MONITOR TELLING US TO DO THIS AT INKJETMALL.)
-
Make a choice of sheet-size to print. (8.5x11, 11x17. 13x19) and set the canvas size to this exact dimension. If you want traditional platinum black brush-mark boarders set the background to Black during this procedure. If you want PiezoDN to automatically mask out the edges of the negative to create a traditional white-border image on the sheet of paper, keep the background White during this procedure.
-
Drag the image into Print-Tool. Set the image size to 100%. There will be a red “image clipping” warning but ignore this. Note: Do not drag and drop a negative into Print-Tool and click the “Invert&Flip” button on. This will mess up all the final tones in your prints and will waste time and energy.
-
Select the ICC profile at the bottom. This profile will most likely be at the very bottom of the ICC profile list in a sub-list called “QTR” if it’s a custom one you built.
-
Make sure “Perceptual” rendering mode is selected.
-
Select the correct printer.
-
Select Page Setup and choose the correct paper size.
-
Hit Print, select the linearized .quad.
-
Hit Print.
-
After the neg has printed, dry it down with a blow-dryer on high and let it sit for a few minutes.
-
Print the neg in the darkroom with EXACTLY the same setup you used when creating the .quad and .icc.
-
If all goes well, the final darkroom print will look exactly like your image on screen and you can continue to utilize this high-resolution, perfectly calibrated digital negative system for fun and art!
Alternative Calibration Workflows
Many people who want to calibrate PiezoDN today probably don’t have spectrophotometers yet. Some have reflective densitometers, some have just scanners. That is all ok! For these people there is a way to calibrate PiezoDN and that is with the 21STEP_SCANNER_TOOL Excel file.
Basically this tool allows you to input 21 L* values from either a reflective densitometer or a scanner and it will make the cgats .txt file you need to linearize your desired .quad curve. If you have a densitometer, just type in the L* values from light to dark and follow the same process described in the calibration steps before this section. For those wanting to calibrate with a flatbed scanner, follow along.
Flatbed scanning your densities:
-
You need a “GOOD” scanner: anything over $150.00 that you are sure you can turn off all color adjustments on.
-
Print a 21 step target of your choice and print in the darkroom.
-
Take the dried-down 21step target print and scan it in with NO color or tonal adjustments.
-
Save this scan file as a tiff.
-
Open the file in Photoshop. Go to Camera Raw Filter and do a Luminance noise reduction at 100% strength.
-
Add a curve layer. Select the black dropper and click the darkest patch to make it totally black. You may have to bring the black datapoint in just a bit past where it is to fully make the blackest printed patch 100% black.
-
Select the white dropper and click the whitest patch (or paper white) to make it totally white.
-
Open your info pallet and set it to 8bit Lab view.
-
Open the 21STEP_SCANNER_TOOL Excel file. (This will only work in Excel!)
-
In Photoshop, hold your mouse over each of the 21 tones in the scan (starting at one step down from white) and record the L* number in the 21STEP_SCANNER_TOOL.
-
After all 21 steps are entered into the tool with the top and bottom values at 100 and 0 respectively, go to the CGATS sheet and copy/paste these values into a new spreadsheet.
-
Save the spreadsheet as a tab delimited document in the same folder as the .quad you want to linearize (the same .quad you used to print the 21step target).
-
Select both the .quad and .txt files and drag them (together) over the QTR-Linearize-Quad droplet to make the new -lin.quad (there are screenshots for this procedure earlier on in this PiezoDN section of the manual).
-
Rename and install this new -lin.quad! You have now successfully linearized your .quad.
-
Because the scanner workflow requires 0% to 100% L values, ICC profiles cannot be create from these targets. You must tune the .quad slightly more contrast if you want your workflow to match the same level of calibration able to be achieved with spectrophotometers. Follow along in the next section to learn how to do
Using PiezoDN with Meth1 and Meth3 Curves
While PiezoDN comes with a full set of initial curves built for specific processes, at its core it is a “profiling” system. That means there is no reason why PiezoDN wouldn’t work with the classic “Piezography Digital Negative” curves that have been the pinnacle of digital negative printing up to this point. The only requirement to make PiezoDN work with Meth1 and Meth3 curves is a conversion. We did this conversion and the PiezoDN-capable Meth1 and Meth3 curves can be found in /Piezography/Curves/PZDN_to_PiezoDN. These different curves can be tuned and linearized just like normal PiezoDN curves (they even invert the image internally just like PiezoDN) however their dynamic range may not be as extreme as the PiezoDN curves because they are not utilizing PK and Shade 2 in exactly the same way. Remember “PZDN” Meth1 and Meth3 curves require shades 2.5 and 4.5 be installed in very specific positions in your printer! You can figure this out by opening a .quad in “QTR Curve Viewer” and looking at the curves and their shade placement.
Custom Tuning
PiezoDN comes with a brand-new tool called PIEZOGRAPHY_CURVE_ADJUSTMENT. This tool allows you to add a Photoshop curve into any .quad you wish. Why would someone want to do this? Many darkroom printmakers have certain wishes for tonal gradations that are not perfectly linear from dark to light. For example, Platinum printers often want wide-open mid-range and short blackened shadow areas. This tonal “intent” can be created using a Photoshop curve and then simply added to an already-linearized .quad.
This process requires you to already be familiar with the PiezoDN system and already be utilizing it for making prints. You need a .quad (or .quad/.icc combo) that you are reasonably happy with that just needs a bit of tuning to get perfect for how you want it. Generally we recommend the .quad you use to tune be already linearized for your alt-process of choice.
This is how you tune a .quad:
-
Print an image you are very familiar with using your current PiezoDN system whether that is with just your linear .quad or with a .quad and .icc from Print-Tool.
-
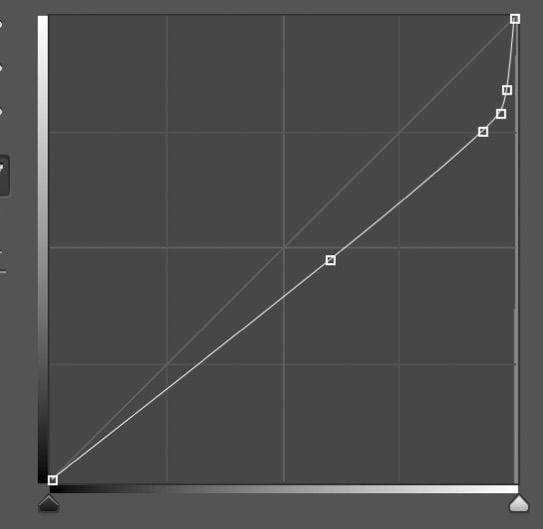
Open the image in Photoshop and add a curve with 4 data points (6 if you include top and bottom points that don’t move). This curve should modify your image to add the “intent” that you want in your platinum print. It’s not exactly going to make the image on-screen look awesome but it’s useful to have the image there just as a reference for how the actual darkroom prints will shift. When you add the curve, you are “imagining” the adjustment taking place to the print in front of you and not really utilizing the monitor image as much.
-
Open the PIEZOGRAPHY_CURVE_ADJUSTMENT tool in Excel. (This is the same tool you use to limit .quads for alt-processes that require thin negatives.)
-
Copy the input and output numbers for each of the 4 Photoshop curve points into the correct boxes. The resulting curve in the tool should look exactly like the curve in Photoshop. Here’s a screenshot of a typical Platinum custom tuning curve applied in the PIEZOGRAPHY_CURVE_ADJUSTMENT tool: 

-
Now go to the CGATS sheet of the tool and copy and paste all the white cells into a new spreadsheet.
-
Save this spreadsheet as a tab-delimited .txt file to the same folder as the .quad you want to tune (the .quad you just printed with).
-
Select both the .txt and .quad files and drag them both over the QTR-Linearize-Quad droplet. This will create a new “-lin.quad” file that has been tuned with your Photoshop curve!
-
Rename this new “-lin.quad” something memorable.
-
Install the new .quad with the Install command found inside of the same folder.
-
Now print the next image exactly the same way only with the new .quad. All new prints will show the tonal shift (intent) that you mocked up in Photoshop!
Advanced Topics
After mastering the basic process and principles of limiting and calibrating your PiezoDN system for a given process, there are many imaginative and useful things you can do with the tools included in PiezoDN.
Here’s one idea. Because QuadtoneRIP lets you BLEND up to three .quads in all three tonal ranges (highlights, mid-tones, shadows) you can mix and combine .quads that are built for different characteristics. For example, if you have a .quad that is custom tuned for high-contrast, and one that is perfectly linear, you can mix and match these two .quads on the fly in QuadtoneRIP to get a unique effect in your printed work.
Another idea/concept. The PIEZOGRAPHY_CURVE_ADJUSTMENT tool builds a special cgats .txt file. If you take this .txt file and drag it over QTR-CREATE-ICC it will create an ICC profile that exactly mimics the Photoshop curve instead of a normal QTR ICC that just pulls the tonal values dark. If you are an old-school darkroom or piezography printmaker that doesn’t want to use the normal PiezoDN ICC workflow and wants to do all your contrast control in a “manual” ICC, you can use the PIEZOGRAPHY_CURVE_ADJUSTMENT tool to do this. In this case you would always print with a linear .quad and then choose your ICC profile based on what intent you wanted in the darkroom.
And another. For those who wish to NEVER deal with spectrophotometers, the curve adjustment tool lets you visually linearize a PiezoDN .quad with your eyeballs and experience alone!
With PiezoDN, the sky is the limit with how much creative control you want to have over your process. The trick to doing this all correctly is to keep it as simple as possible, learn the steps in order, clear your mind of expectations or past pre-conceptions about what a digital negative is, and let the art flow.
Troubleshooting & Printer Instructions (1430 through P9000)
Printers are not designed or built for film printing. This can be a source of endless frustration on the part of the artist who is trying to get the printer to work with film. The problems are numerous but the break down roughly as follows. Most everything has been covered at https://forums.piezography.com As a PiezoDN or PPE customer you have access to this forum.
Star wheel marks appear on the film. This is a problem with small format printers (17” wide and smaller) because these printers have small metal star wheels that grab the film after it’s inked! in order to allow the printer to print the last inch of the paper after the paper has left the back roller. This is normally not an issue for ink-on-paper but is not ideal for film printing because the film/ink combo is very fragile. For the 1430 and other 13” small “cart-on-head” style printers this is a good forum thread to look over to learn how to modify your printer: https://forums.piezography.com/t/epson-1430-printer-modifications/209 If you are using a printer that allows for front-feeding (The P600 all the way to the P800) you can use this technique to modify your printer to disable the star wheels: https://forums.piezography.com/t/star-wheels-video-3880/195 All the other printer models do not have star wheels so they are not an issue. One exception to this is the 48xx to 4900 models. These have star wheels that rotate down after the print has started but not before the film hits the wheels. You can simply manually shove the star wheel bar back up before the film hits and you’ll be fine.
My print-head hits the film. This is generally a problem with small printers that do not have a vacuum platen (that sucks the film down). Curl the film away from the emulsion on all 4 corners right before your print and this will keep the head from striking.
I see issues at the top and bottom of my film. Some small format printers don’t like to print correctly on first and last inch. When this happens you can simply tape a 4” paper leader to the top of the film and bottom of the film. This leader is the exact width of the film and taped at the back (flush with the film). Add 8” to your paper size and position your image correctly. This way the printer is already 4” deep when it starts printing your image and you can maximize your film usage.
Ink bleeds on the film. First make sure you film is emulsion-side-up. Second make sure you are using the correct type of film. PiezoDN (pigment ink) uses Ultra Premium Pictorico OHP film and nothing else. The UP film takes 30% more ink than other film and keeps the ink from bleeding.
I see vertical bands on my film/darkroom print. This is caused by a head alignment issue. Do a manual UniD alignment on paper from the printer’s control panel or the Epson printer utility.
I see horizontal bands on my film/darkroom print. This can be cause by a lot of different things but the first thing to do is a nozzle check. If a nozzle is out you will see horizontal lines. Do a cleaning and they will most likely go away. The second thing to do is check your platen gap. This should be normal or narrow for film. The third thing to do (on Professional level printers) is to check your paper feed speed and possibly lower it. The forth thing is to look at your printer settings. You should be printing at UniDirectional speed and the highest resolution possible (2880 Super or 2880 whatever is available as the last highest option). If all things have been tried and you still get horizontal banding there could be a more fundamental issue with the head’s position or condition in the printer and posting on the forum https://forums.piezography.com will probably be the way to go.
My first target print is blown out or way off linear. Everybody’s printer/darkroom/exposure-booth is different. While we publish some masters that get close results will vary. This is why there is a whole workflow for tonal limiting and calibration. So that is what you have to do.
I linearized my print but the validation is way off. One of the first things people who are new to PiezoDN realize is that PiezoDN is only as good as your darkroom consistency. For some processes, a 10% shift in paper humidity from first print to validation print could equate to a 30% shift in tonal values (mostly lighter). Usually this is just not really thought about much if you aren’t actually measuring and graphing your progress over time (what PiezoDN allows one to do). Now that you are measuring your progress you can see the shifts and drifts. Take a step back and control your darkroom conditions first: then calibrate.
My curve is printing 100% of ink all over the film. Re-install QuadtoneRIP. This will re-set the permissions in your system and everything will work again.
For more information please review the “Getting Started Guide for PiezoDN.pdf” in the Piezography folder and also look at the forum at https://forums.piezography.com