How to Initial Fill Your Printer
An Initial Fill Cycle is necessary for flushing all channels simultaneously when changing inks, or when installing PiezoFlush for cleaning or long-term storage, and especially so when trying to clear internal clogs from printheads and ink exchange units.
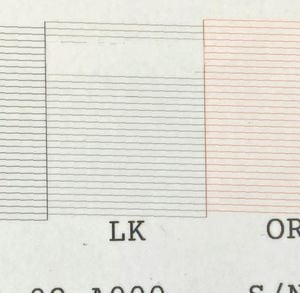 Why do you have to use the Initial Fill instead of running 20-30 Power Cleans or Powerful Paired Cleanings? To move PiezoFlush to your clogged head with that many cleaning cycles will burn out that ink channel and may affect adjacent channels. You can not do that without causing harm to the printhead. You should never run more than 2-3 Power Cleans in a row. They use electrical stimulus to the head and are not intended to be used one after another. The INITIAL FILL is the only procedure that uses suction alone. Yes, it wastes ink in all the positions, but it will not damage or delaminate your print head. That photo of the LK channel with the swath through it is what a delamination looks like during a nozzle test. If you are struggling with a clog, do not allow this to happen. If it has, an 11 ink color printer can be converted for use with Piezography. But to continue printing in color you will need replace the print head.
Before doing an Initial Fill Cycle, make sure 1. all cartridges contain enough ink or flush to avoid running empty (they should be at least 30% full or the sequence may fail mid-cycle), and 2. you have a spare waste tank on hand (or your current waste tank is less than 30% full). Note: the R3000 and P600s do not have removable waste ink tanks (all other printers listed on this page do), but an external waste ink bottle can be attached to divert waste ink to a bottle, which can be emptied as needed (instead of waste ink going into the bottom of the printer, which requires the pads be replaced by a service tech), and waste tank sensor reset using the Windows Epson Adjustment Program or Mac Waste Pad Reset (WIC Reset) Program. OS X Users can download a free trial of Parallels Desktop for Mac from Parallels that installs Windows on OS X.
IMPORTANT: The Initial Fill Cycle is performed using software or LCD panel instructions that EPSON field service repair people use and therefore no warnings are given if there is not enough room in the maintenance tank or the cartridges are not full enough. Repair persons know to check on this first which obviates the need for a warning! It is important less you end up with PiezoFlush leaking out of your maintenance tank or the sequence stopping before complete because of the detection part way through of a low ink supply as recorded on the cartridge's chip.
The Amount of PiezoFlush Required Varies from Model to Model.
The best practice is to fill the refillable cart to its full mark so that the chip (which already reads 100% full) will be in sync with the cart contents. However, you can elect to under-fill the carts as long as you ignore the Status Monitor or the reported amount of ink remaining in the cartridge - and instead visually check the cartridge to make sure it does not run empty. The following is a chart indicating the amount of ink discharged per channel as well as the minimum level required to operate the cartridge for the following printers:
INITIAL FILL MODEL: QTY FLUID PER LINE PER INIT CHARGE
-
R3000 / SC-P600:10ml per channel (x8 channels)
-
Pro 3800 / 3880 / SC-P800:14ml / channel (x9 channels)
-
4000 / 4800 / 4880:18ml / channel (x8 channels)
-
4900:18ml / channel (x10 channels)
-
7600 / 7800 / 7880 / 7890 / SC-P6000:28ml / channel (x8 channels)
-
7900 / SC-P7000:28ml / channel (x10 channels)
-
9800 / 9880: 40ml / channel (x8 channels)
-
9890 / SC-P8000: 40ml / channel (x9 channels)
-
9900 / SC-P9000:40ml / channel (x10 channels)
We recommend two Initial Ink Charge Procedures for clearing clogs, one for flushing for storage, and as many as two or three for preparing for Piezography to remove all residual color pigment stain. For example, if you wish to try and clear a clog in a 4900 you would need the following minimum amount of PiezoFlush per cartridge (30ml minimum operating amount, + two times 18ml = 66ml). However, you should allow yourself overhead for running nozzle cleans and nozzle checks, and or additional Init Charges.
Epson SC-P600:
-
 Purchase and download the Adjustment/Service Program specific for your printer model from www.2manuals.com
 -
(NOTE: Adjustment Programs are only PC compatible)
-
(OS X Users can download a free trial of Parallels Desktop for Mac from Parallels that installs Windows on OS X.)
-
Open the Adjustment/Service Program, and select “Ink Charge” or “Ink Eject and Initial Charge”.
-
When complete, close the program.
Epson R3000:
-
Purchase and download the Adjustment/Service Program specific for your printer model from www.2manuals.com
-
(NOTE: Adjustment Programs are only PC compatible)
-
(OS X Users can download a free trial of Parallels Desktop for Mac from Parallels that installs Windows on OS X.)
-
Open the Adjustment/Service Program, and select “Ink Charge” or “Ink Eject and Initial Charge”.
-
When complete, close the program.
Epson 3800/3880:
-
3-4 Power Clean Cycles can be done thru the printer’s control panel, which is the equivalent of doing 1 Initial Fill Cycle
-
To do a Power Clean Cycle, push the Menu button on the printer, scroll down to select Maintenance, then scroll down to select Power Clean, then push the center circle button to start the cycle. NOTE: Power Clean Cycles will only flush the black ink channel that the printer is currently in the mode of (where as the Initial Fill will purge ALL channels at once, including both blacks)
Epson P800:
-
 NOTE: 3-4 "Heavy" Clean Cycles can be done thru the printer’s control panel, which is the equivalent of doing 1 Initial Fill Cycle
 -
To do a Heavy Clean Cycle, push the Menu button on the printer, scroll down to select Maintenance, then scroll down to select Heavy Clean. NOTE: Heavy Clean Cycles will only flush the black ink channel that the printer is currently in the mode of (where as the Initial Fill will purge ALL channels at once, including both blacks)
-
Purchase and download the Adjustment/Service Program specific for your printer model from www.2manuals.com
-
(NOTE: Adjustment Programs are only PC compatible)
-
(OS X Users can download a free trial of Parallels Desktop for Mac from Parallels that installs Windows on OS X.)
-
Open the Adjustment/Service Program, and select “Ink Charge” or “Ink Eject and Initial Charge”.
-
When complete, close the program.
Epson Pro 4000:
-

Start with the printer power OFF
-
Hold the Left, Down and Up buttons while turning the printer on. The printer will start in “Self Testing Mode”.
-
Scroll to and select CLEANING.
-
Scroll and select INIT FILL.
-
When finished, exit Self Testing Mode by turning the printer off, then back on regularly.
Epson Pro 4800/4880:
-

NOTE: 3-4 Power Clean Cycles can be done thru the printer’s control panel, which is the equivalent of doing 1 Initial Fill Cycle
-
To do a Power Clean Cycle, push the Menu button on the printer, scroll down to select Maintenance, then scroll down to select Power Clean, then push the Menu button to start the cycle.
-
Hold down the PAUSE, RIGHT, DOWN buttons while turning the printer back on to start it up in “Self Testing Mode”.
-
Press the MENU button.
-
Select CLEANING.
-
Select INIT FILL.
-
When finished, exit Maintenance Mode by turning the printer off, then back on regularly.
Epson 4900/5000:
-

Purchase and download the Adjustment/Service Program specific for your printer model from www.2manuals.com
-
(NOTE: Adjustment Programs are only PC compatible)
-
(OS X Users can download a free trial of Parallels Desktop for Mac from Parallels that installs Windows on OS X.)
-
Open the Adjustment/Service Program, and select “Ink Charge” or “Ink Eject and Initial Charge”.
-
When complete, close the program.
Epson Pro 7600/9600:
-

Start with the printer power OFF
-
Hold the Down, Up and Cut/Eject buttons while turning the printer on. The printer will start in “Diagnostics Mode”.
-
Push the Menu button, scroll to and select CLEANING.
-
Scroll and select INIT FILL.
-
When finished, exit Serviceman Mode by turning the printer off, then back on regularly.
Epson pro 7800/9800 and 7880/9880:
-

Start with the printer power OFF
-
Hold the Down, Right/Menu and Center Cut/Eject buttons while turning the printer on. The printer will start in “Self Testing Mode”.
-
Scroll up to CLEANING, and select by pushing the right/Menu button.
-
Scroll and select INIT FILL.
-
When finished, exit Self Testing Mode by turning the printer off, then back on regularly.
Epson Pro 7890/9890 or 7900/9900 or 7700/9700:
-
Start with the printer power OFF
-
Hold the Menu/Right, Paper Feed/Down and OK buttons while turning the printer on. The printer will start in “Serviceman Mode”.
-
Push the Menu button, scroll to and select CLEANING.
-
Scroll and select INIT FILL.
-
When finished, exit Serviceman Mode by turning the printer off, then back on regularly.
-
We have published an article about how to Cancel the Initial Fill Process here.
Epson P6000/P8000 or P7000/P9000:
-
Purchase and download the Adjustment/Service Program specific for your printer model from www.2manuals.com
-
(NOTE: Adjustment Programs are only PC compatible)
-
Launch the Epson Service Adjustment Software and click on the ADJUSTMENTS(Individual).
-
(OS X Users can download a free trial of Parallels Desktop for Mac from Parallels that installs Windows on OS X.)
-
Click on Ink Charge on the Ink System Menu. In the Ink Charge screen click on the RUN button. The printer will now perform the original ink initialization. It takes several minutes. Between 15ml and 45ml of ink in each position will be charged through the system. Do not interrupt the printer or system. You will see a confirmation that the ink charge has been completed when it is finished.