Small Format Refillable Cartridge Instructions
For Epson™ 1400/1430, R2000 & R2880 & P400 (as well as older printers such as R800, R1800, R1900, etc)
Buy ink for 1400/1430/1500W Buy ink for R2000 Buy ink for R2880 Buy Ink for P400
The instructions below describe how to fill and use refillable cartridges, in general terms, for small format printer models. Filling and using these cartridges is easy, provided you are prepared before you begin and follow the instructions below. High quality ink is available in various size bottles from this website.
Before you Start:
-
Inspect cartridges for damage and make sure chips are secured flat to carts before filling with ink.
-
Test your printer with Epson carts to make sure it works perfectly before installing any third party inks/carts, even if using a brand new printer.
-
Piezography ink users: Clean color ink off points in print head. Using Q-tips and PiezoFlush or distilled water, carefully wipe each point in a circular motion with a moist Q-tip, then absorb remaining liquid using dry Q-tips. This is to avoid color staining in your B&W cartridges and prints.
Filling Procedure:
-
Place empty cartridges, ink bottles and syringes on a work surface. Choose filling area and clothes you wear carefully, as accidents can happen, and pigment ink is permanent. Have glass cleaner and paper towels handy in case ink is spilled, and wear rubber gloves when working with ink.
-
Select the correct bottle of ink for the cartridge, and shake it gently. Unscrew the cap, and remove the silicone plug or cut around the foil seal to open the bottle.
-
Fill a syringe with 15ml of ink using a blunt needle to draw ink out of bottle. Make sure to fill each cartridge with the correct ink; if mis-filled with the wrong ink, cartridges can not be cleaned and must be replaced.
-
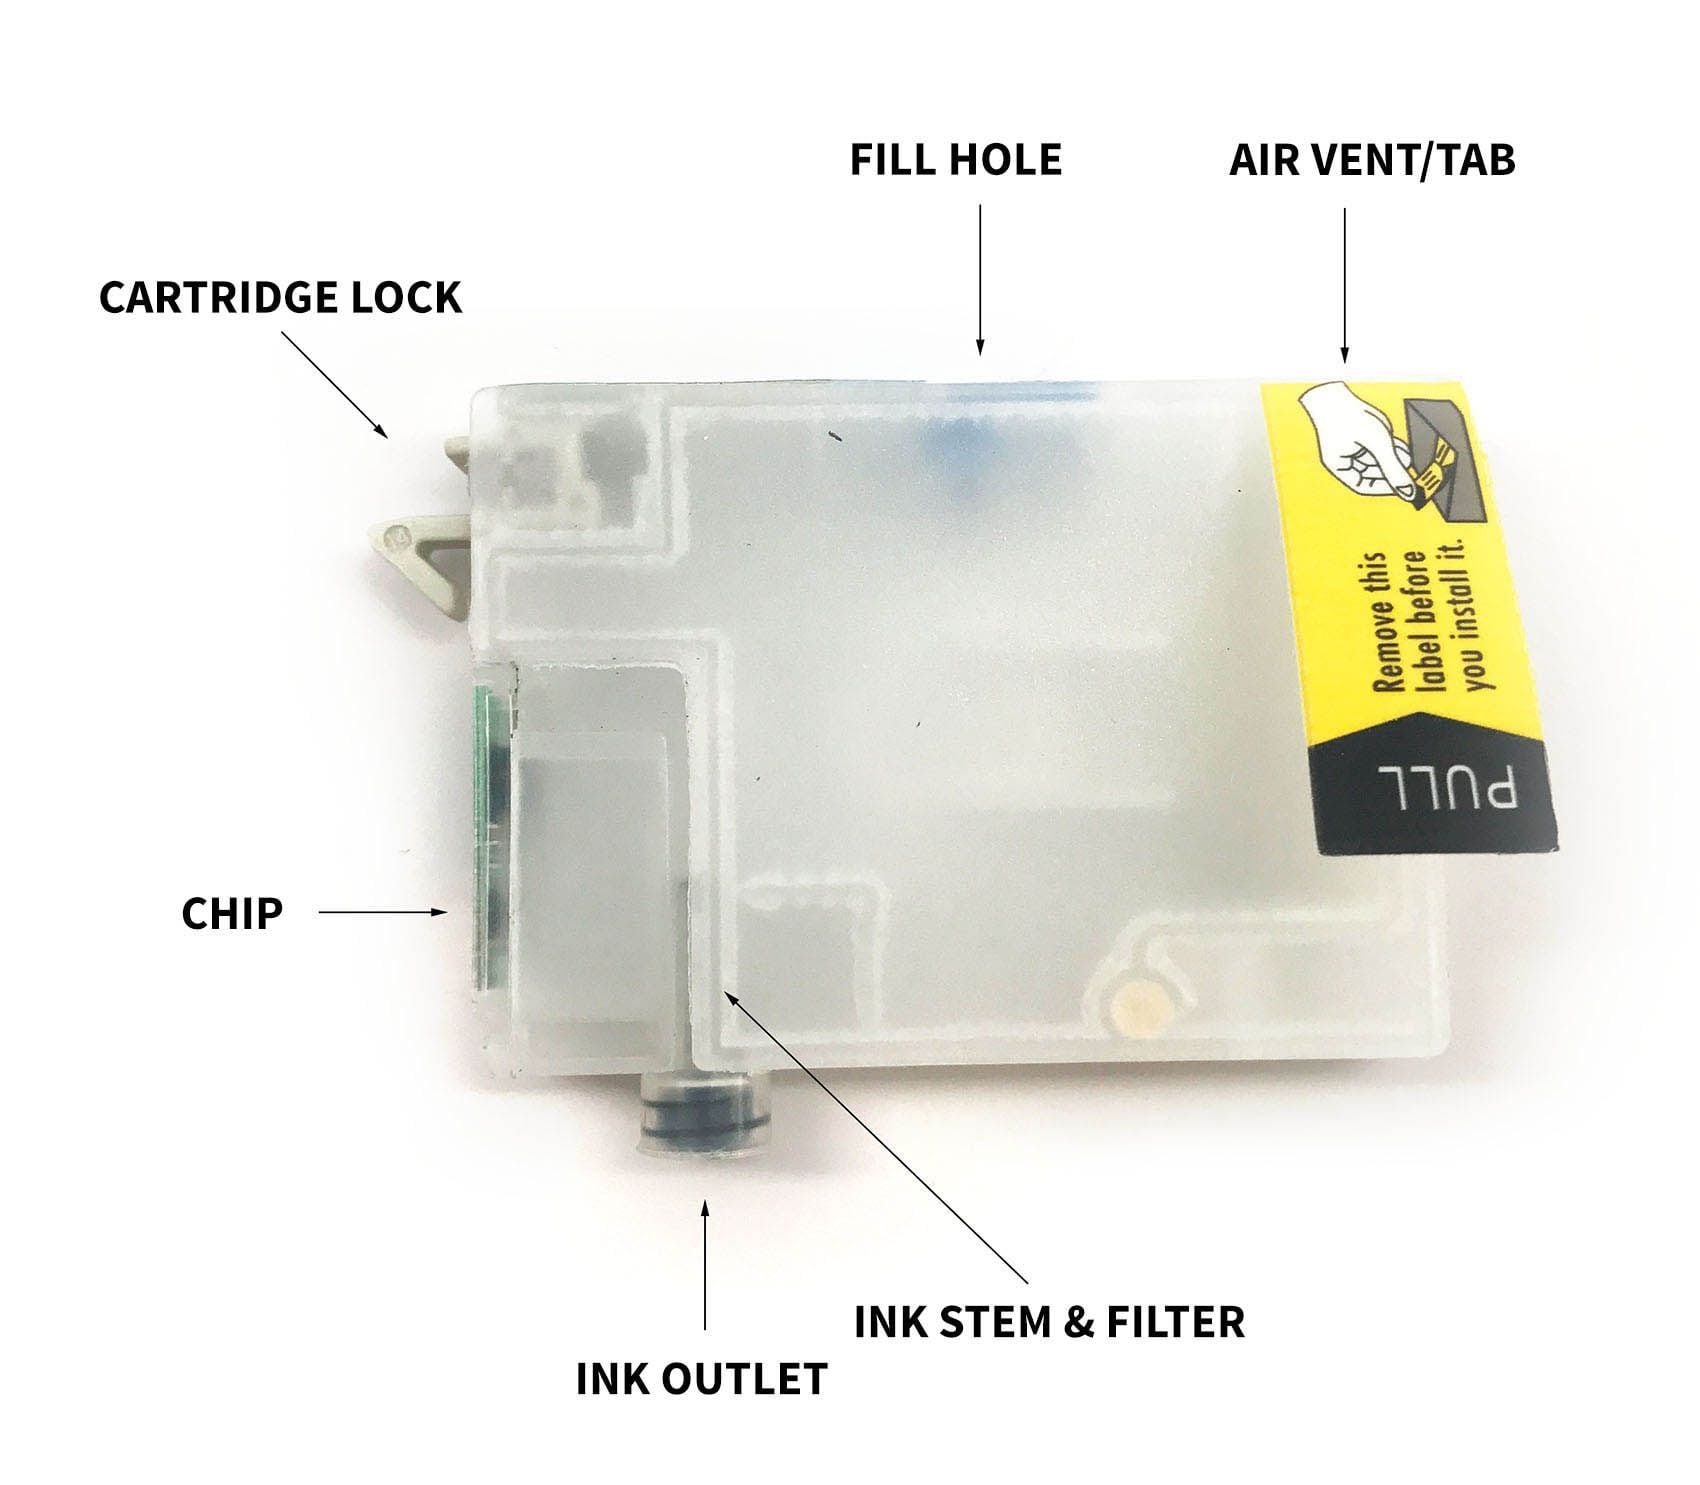
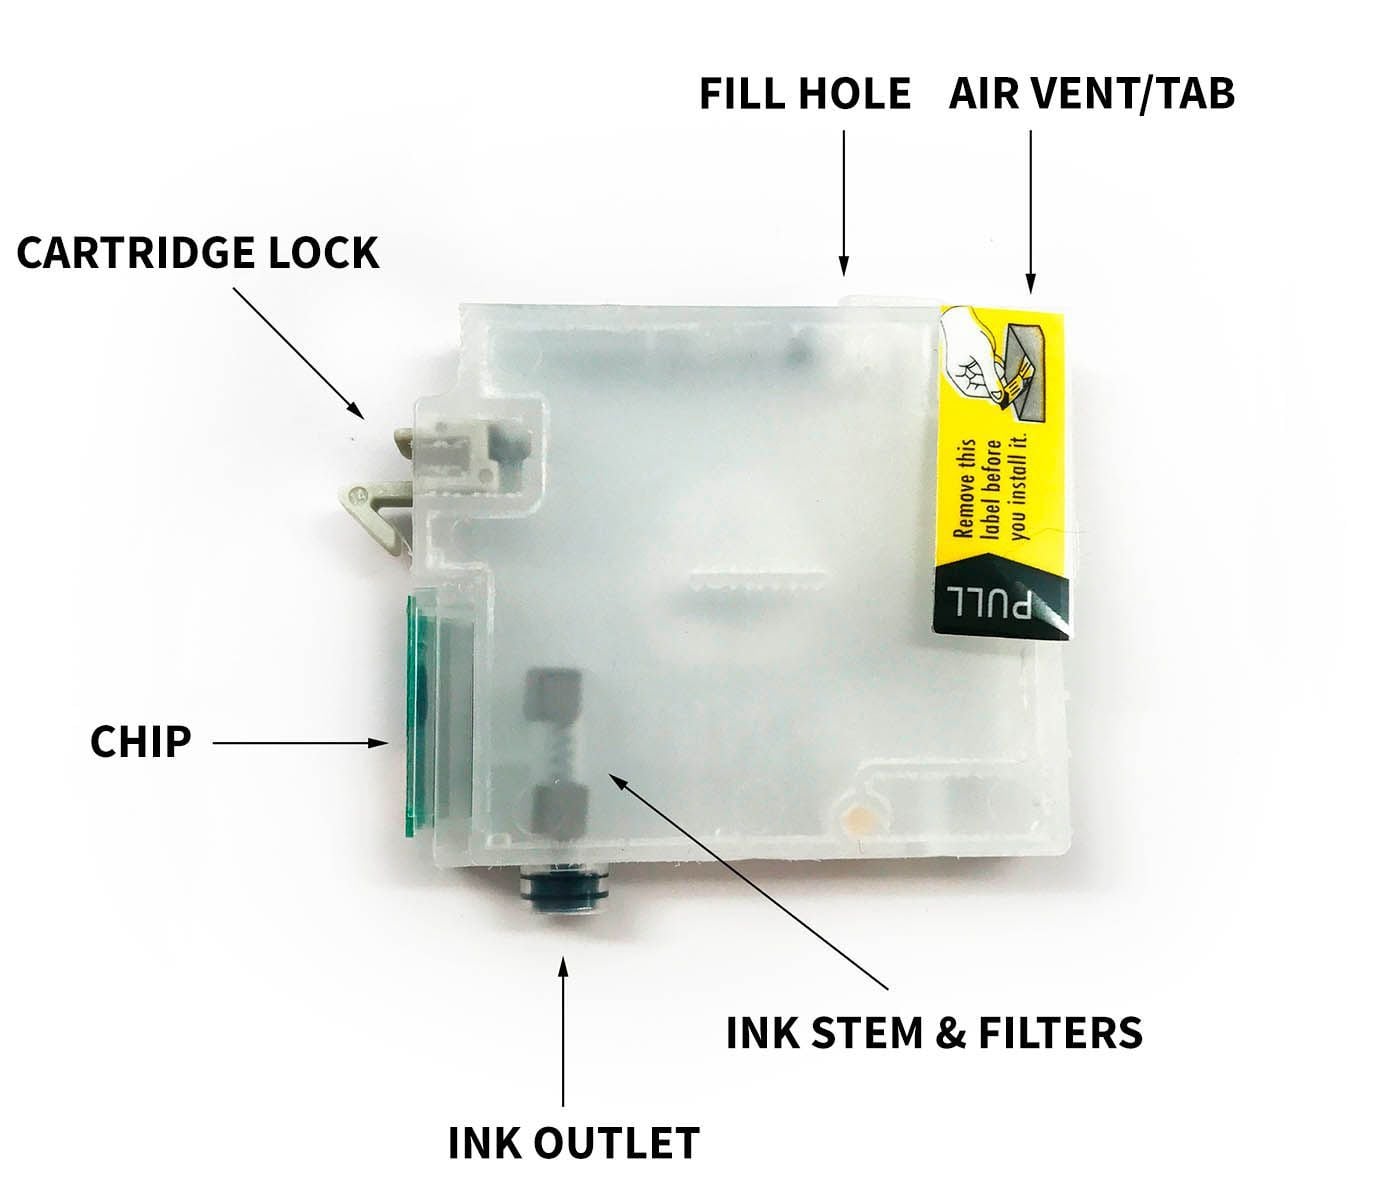
Remove fill hole plug from top of cartridge. Keep the air vent tab (or plug) in!
-
Leaving needle attached to syringe, insert needle into cartridge fill hole. Hold cartridge at an angle with fill hole up and ink outlet down, then gently push syringe plunger to slowly fill or refill cartridge with ink. Tap side of cartridge with your knuckle to release trapped air and allow ink to settle, then continue filling. Do this slowly.
-
Once cartridge is filled with ink, remove needle from cartridge and insert rubber plug securely back into the fill hole. For accurate ink level tracking, cartridges must be almost totally filled (a small air bubble is ok, but too much air can cause the cart to empty before the printer gives warning).
-
Gently tap filled cartridge a few times exit valve (cartridge outlet) down on a folded paper towel to force air up and ink down. Remove air vent plug/tab from the cartridge, making sure vent hole is fully OPEN. Do not remove top or side labels.
-
Install cartridges into printer (make sure they snap firmly in place for proper instillation), wait 10-15 minutes to allow ink to settle, then run 1-3 cleaning cycles and print a nozzle check to verify all positions are fully printing. Now you are ready to print! Syringes and needles can be rinsed out with water, air dried and reused many times.
-
If you notice that one or two ink channels are clogging when you have put brand-new (NEW) cartridges into your printer, you will need to take those cartridges out and prime them with the optional priming tip that comes with your kit. This tip can be rinsed out between uses.
-
-
Put your priming tip on one of the syringes that came with your cartridge kit. These tips simply fit directly over the end of the syringe.
-
Push the syringe (with priming tip) into the cartridge outlet and suck just a tiny bit of ink out (about 1mL will do).
-
This action will get rid of any air that is locking the ink from entering your printer’s head.
-
Do 1 or 2 standard cleanings on your printer. Let the printer sit a few minutes between cleanings. At this point you should see all nozzles working!
-
You never have to prime your cartridge again. This is only done as an optional procedure the first time you use a brand-new cart.
-
Refilling Procedure:
Keep track of the ink level and do not allow cartridges to run dry. When a cartridge is empty and needs to be refilled, check the other carts and refill any others that are also low if you wish (but only the one that read empty will reset the ink level after being reinserted into the printer, unless a chip resetter is used to manually reset the ink level). Gently shake ink bottles to ensure pigment is in suspension before filling or refilling carts. Always make sure carts are filled and refilled with the correct ink- if carts are mis-filled with the wrong ink, they can not be cleaned and corrected- in this case you must use new carts.
These cartridges can be refilled & reused MANY times, though for best results we recommend replacing after about a year of use.
-
Have ink, blunt needles and syringes ready on a workspace before removing carts from printer to refill.
-
Remove colored plug from cartridge fill hole and leave air vent hole OPEN. Draw 15ml ink into the syringe. Leaving needle attached to syringe, insert needle tip into cartridge fill hole. Hold cartridge with fill hole up and ink outlet down then gently push syringe plunger to slowly refill cartridge with ink. Tap side of cartridge with your knuckle to release trapped air and allow ink to settle then continue filling. During this process you can place a finger over the vent hole or tape over it temporarily. This keep ink from entering the vent tab filter area. Make sure never to let your carts tip over during the refill process!
-
Once cartridge is refilled with ink, remove needle and reinsert fill hole plug, then tap cart exit valve down on a folded paper towel a few times and reinstall into pinter. After installing refilled carts into the printer, wait 10-15 minutes for ink to settle. Always print a nozzle check after refilling carts before printing images.
How to Reset Ink Levels:
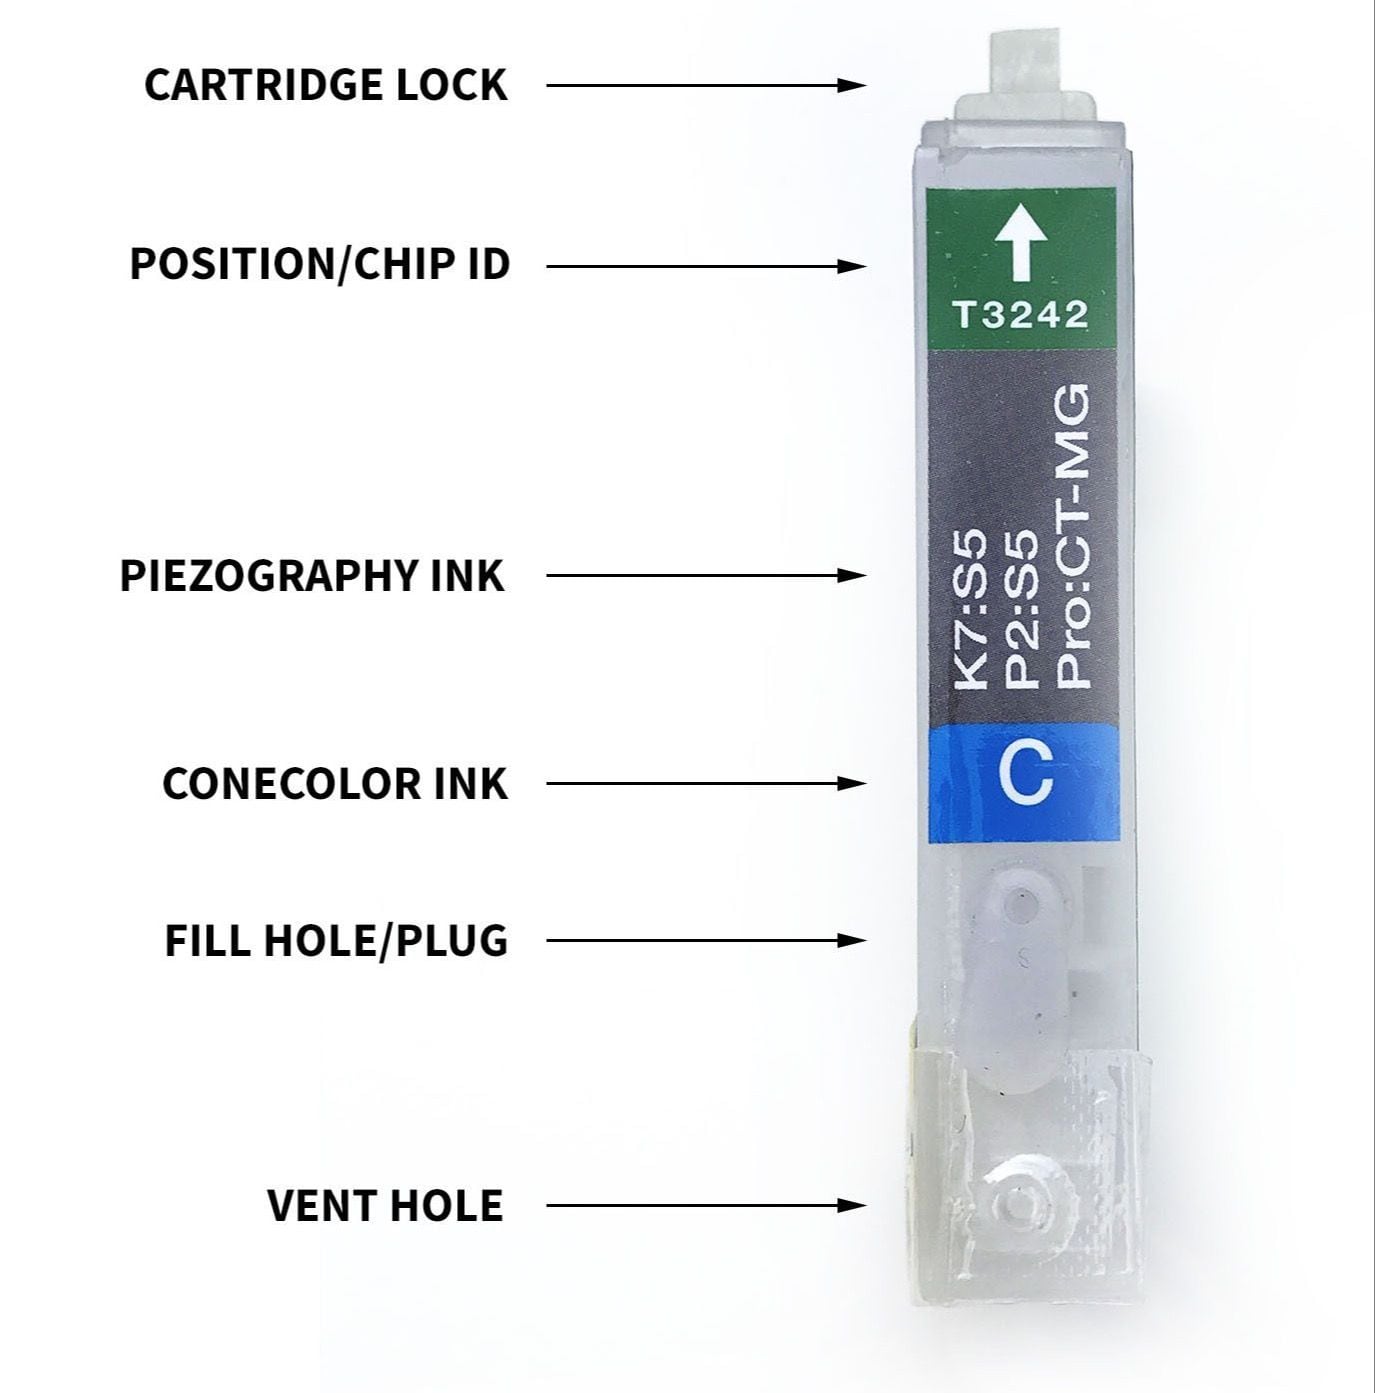
These refillable cartridges use Auto Reset Chips, which are designed to reset the ink level when a cartridge reads empty in the printer, is removed, refilled with ink then reinstalled in the printer. Upon re-instillation, the chip will reset to read full again. NOTE: Ink level will ONLY reset when the ink out light appears on the printer. Only the cartridge that reads empty will reset so that less than full cartridges will not be mistakenly reset to read full, which could cause a cartridge to run dry . If you wish to refill and reset all carts at once, a chip resetter can be used to manually reset ink levels to read full on some small format printers. The 1400, 1430, R1900 and R2880 refillable cartridges use the same chip resetter, available thru InkjetMall.
For Piezography Users:
Please go to the top menu item labeled "Support" got to "Piezography Instructions" and click on your printer under the "Conversions" heading.
Troubleshooting & Helpful Information:
-
Use the printer on a regular basis for best function. To keep the ink moving thru the cartridges and head moist, print a small image or do a cleaning cycle at least once a week if the printer is not used regularly. It is NOT good to leave pigment ink installed in a printer that will not be used for an extended time- its best to install flush carts and flush ink for safe storage if your printer will sit unused for a month or more (see below for additional information on flushing and storing your printer).
-
Long term storage of printer: We do not recommend letting a printer sit unused with pigment inks installed. If you do not plan to use a printer for an extended period of time, it is best to remove ink cartridges, install a set of flush cartridges and flush ink from the print head by doing 3-4 cleaning cycles, before turning it off for safe storage. Store unused cartridges upright in a sealed plastic bag to avoid drying.
-
When carts are not being used (in or out of the printer), we recommend sealing air vent holes with plugs or electrical tape to keep carts moist and prevent drying. Make sure air vent holes are OPEN before printing for proper ink flow.
-
For the best results, monitor and maintain humidity levels between 40-60% in the printing area (this is based on Epson’s recommendation). Both low and high humidity can cause problems with the printer, ink and paper.
Problem: My printer does not recognize the cartridges.
Answer: Please compare numbers on the refill cartridges and the Epson OEM carts to make sure they match. If any of your refill cartridge numbers don’t match OEM numbers, please send pictures to show us the whole set of cartridges with chip numbers.
If the cartridge numbers DO match OEM, please remove the whole set of carts and disconnect the printer power and USB/Cables. Leave the printer off for at least 30 minutes then plug the printer’s power cord back in, turn the printer on and re-insert the whole set of refillable carts. You can reconnect the printer USB/Cable after your printer recognizes the refillable carts.
Problem: I have filled the cartridges with ink but no ink comes out when I try to print.
Answer: Make sure air vent tabs are fully removed and air vent holes open, then gently tap cartridges a few times exit valve down on a folded paper towel to release any air that may be restricting ink flow. Reinstall cartridges snugly into the printer’s cartridge carriage, then do 1-2 cleaning cycles and print a nozzle check. If there are still missing nozzles, wait about 15 minutes then do another cleaning cycle and print a nozzle check.
Problem: When I print there are lines on the paper.
Answer: Lines on the paper are often caused my missing or mis-firing nozzles (called “banding”), but mis-alignment can also cause lines in the print. Print a nozzle check to make sure all positions are fully and correctly printing. If there are missing or mis-firing nozzles, make sure the air vent tab is fully removed and air vent hole open, then gently tap cartridges a few times, exit valve down on a folded paper towel to force the ink down and release any air that may be restricting ink flow. Reinstall the cartridges snugly into the printer’s cartridge carriage for a tight seal then do 1-2 cleaning cycles before printing another nozzle check. If all nozzles are printing and in the correct positions (not mis-firing), then align the printer to the paper thickness you are printing on.