Extra Large Refillable Cartridge Instructions for Epson™ R3000 & P600 Printers
The instructions below describe how to fill and use refillable cartridges, in general terms, for the R3000 and P600 printer models. Filling and using these cartridges is easy, provided you are prepared before you begin and follow the instructions below. High quality ink is available in various size bottles from this website.
Before you Start:
-
Inspect cartridges for damage and make sure chips are secured flat to carts before filling with ink.
-
Test your printer with Epson carts to make sure it works perfectly before installing any third party inks/carts, even if using a brand new printer.
-
Piezography ink users: Clean color ink off points in print head. Using Q-tips and PiezoFlush or distilled water, carefully wipe each point in a circular motion with a moist Q-tip, then absorb remaining liquid using dry Q-tips. This is to avoid color staining in your B&W cartridges and prints.
Filling Procedure:
-
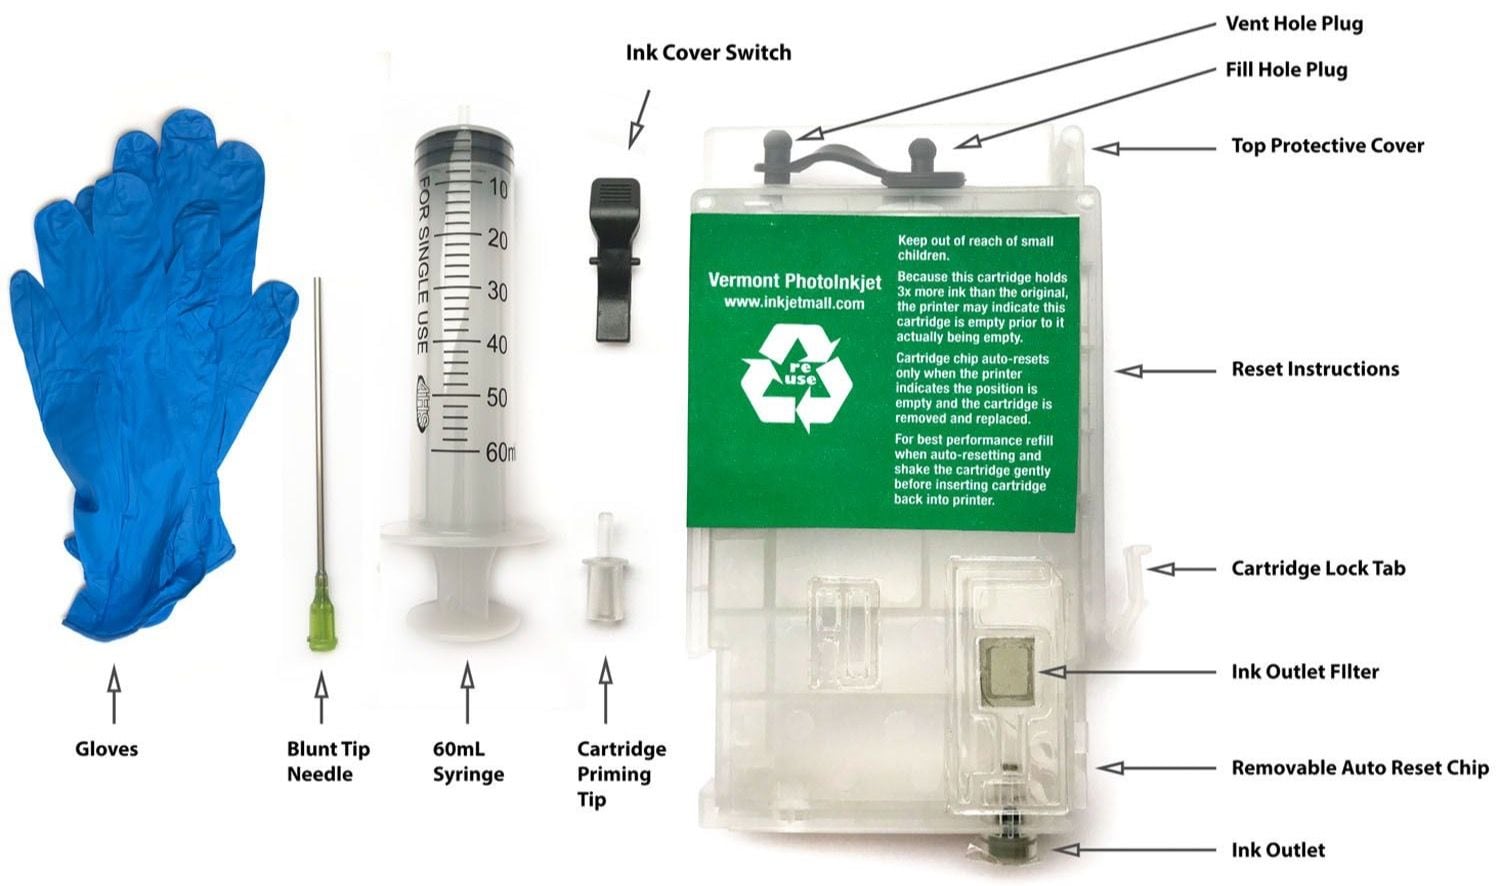
Place the ink cartridge on a clean surface. Put on the rubber gloves. Take the correct bottle of ink (as noted by the cartridge label). Take out one syringe, one priming tip, and one blunt tip needle. Keep a roll of paper towel handy.
-
Remove the orange lock protector. With the lock protector facing you, pull it horizontally to the left to remove it. Do not break the lock tab.
-
Pop the top protective cover of the cartridge up, and pull out the Fill Hole Plug (keep the vent hole plug in).
-
Place the blunt tip needle on the 60mL syringe.
-
Unscrew the bottle top and then pull the vent nipple out. This can be difficult, so sometimes putting a bit of paper towel between your fingers to get a better grip on the vent nipple gives the leverage you need.
-
Put the syringe with the blunt tip needle into the ink bottle and suck out 60mL of ink (or less if you want to do this in chunks.)
-
Depress the 60mL of ink into the fill hole of the cartridge SLOWLY. If you see bubbles escaping change the position of the needle a bit.
-
You do not have to fill the cartridge entirely. There should be a bit of room at the top of the cartridge. That is ok.
-
Put the Cartridge Fill Hole plug back in and take out the vent hole plug.
-
Tap the side of cartridge with your knuckle to release trapped air and allow ink to settle
-
Remove the blunt tip needle from the syringe and put on a priming tip.
-
Hold the cartridge roughly vertical (semi-horizontal is ok, upside down is not).
-
With your other hand, insert the priming tip into the cartridge's Ink Outlet and suck out ink (about 1mL to 2mL worth). This will get rid of any air that is between the ink cartridge and ink outlet. Put the cartridge to the side and proceed to the next cartridge
-
Repeat this procedure for any or all cartridges that you wish to fill and use.
Install Cartridges:
 Ink Cover: Because these cartridges are over-sized, you must take off the ink cartridge cover. Swing it up, and pushing the cover left to release the right hinge. Then it will pop out. (It can be snapped right back in in the future if you are selling this machine). Note: It takes some force to get it out but it flexes enough to do it.
Ink Cover Switch: There is a small switch provided with your ink set or cartridge. It tricks the printer into thinking your ink cover is still down (even though it’s not even there). After installing the cartridges, place this switch into the correct slot as shown below. Note: Always take the switch OUT before doing anything with cartridges. Put the switch back after inserting your cartridge(s).

 Printer Cover Switch:
There is a second small switch provided with your ink set or cartridge. This second switch tricks the printer into thinking the entire printer cover is still down. Put this switch deep into the middle slot of the printer (just to the right of the first switch) as shown on the right. It will lock into place. You can keep this switch in forever.
Printer Cover Switch:
There is a second small switch provided with your ink set or cartridge. This second switch tricks the printer into thinking the entire printer cover is still down. Put this switch deep into the middle slot of the printer (just to the right of the first switch) as shown on the right. It will lock into place. You can keep this switch in forever.
Editor's Note: Sometimes this second switch can be a little hard to lock into place. I find a torn and folded piece of thick matte inkjet paper works best.
Refilling Procedure:
When an ink cartridge chip resets, it will show as “Ink Cartridge Error” on the printer and the printer will pause. Take the cartridge out, and top it off, and put the cartridge back in.
Keep track of the ink level and do not allow cartridges to run dry. Shake ink bottles to ensure pigment is in suspension a few minutes before filling or refilling carts (to let froth settle). Plug the vent hole during any agitation of the ink cartridge. Always make sure carts are filled and refilled with the correct ink, if carts are mis-filled with the wrong ink, they can NOT be cleaned and corrected- in this case you must use new carts. This is particularly important for magenta and light magenta cartridges.
These cartridges can be refilled & reused MANY times, though for best results we recommend replacing after about a year or two of use.
-
Have ink, blunt needles and syringes ready on a workspace before removing carts from printer to refill.
-
Remove plug from cartridge fill hole and leave air vent hole OPEN. Draw about 35ml of ink (or however much you need to top off the cartridge) into a syringe. Leaving needle attached to syringe, insert needle tip into cartridge fill hole. Hold cartridge at an angle with fill hole up, then gently push syringe plunger to slowly refill cartridge with ink. Tap side of cartridge with your knuckle to release trapped air and allow ink to settle, then continue filling.
-
Once cartridge is refilled with ink, remove needle and reinsert fill hole plug, then tap cart exit valve down on a folded paper towel a few times to force air up and ink down.
-
If there’s ink build up on cartridge exit ports, gently clean with Q-tips in a circular motion before reinstalling.
-
Reinstall carts into the printer, then wait 10-15 minutes for ink to settle. Always print a nozzle check after refilling carts, before printing images.
NOTE: If a cartridge is totally empty and exit chamber is less than 1/2 full, fill the cartridge using the same procedure as you would use when you fill a new cartridge (filling and priming) as described in the “Filling Procedure” section above.
For Piezography Users:
One Initial Fill cycle must be preformed to get ink from cartridges to the print head. If color inks were used in the printer before Piezography—new P600s force this by the way—check for color staining in your print output after the Initial Fill completes. If color staining is still present—yellow is usually the worst, which will show up in the highlights)—perform a few Cleaning Cycles to purge remaining color. WicReset can be used to supply the initial fill command.
Please go to the Support menu above and select the Piezography Conversion instructions for more information on converting to Piezography with this printer (including ink shade placement charts!)
PiezoFlush:
To flush your printer’s internal ink lines, dampers and print head, install the set of carts filled with PiezoFlush and run an Initial Fill Cycle using the Adjustment Program or WicReset.
The Adjustment Program is only compatible with Windows, and can be downloaded from www.2manuals.com. WicReset works on Mac. Additional information about flushing your printer can be found on our Support Forum. All chips must read full before an initial fill cycle is performed.
Note: 1 Initial Fill Cycle with deplete the chips 2/3rds of the way and will not allow for a second initial fill. You must print with the chips in-place until they reset in order to to a second initial fill.
Auto Reset Chips (ARC):
These cartridges can be refilled & reused many times, though for best results we recommend replacing after about a year of use.
-
The chip is programmed to automatically reset when the cartridge reads empty in the printer, is removed, refilled with ink, and reinstalled. Upon reinserting the cartridge, the ink level will be reset to full. This style chip can NOT be manually reset.
-
Warning 1: The new style auto-reset chips may not show up on the printer as “empty” when they have reset. They may show up as a “cartridge error.” Whenever you see an “error” displayed for one of the auto-reset chips, take the cartridge out and TOP OFF the ink level. Most likely the chip has reset to full. These chips play it safe by resetting to full when the ink has only dropped a small amount.
-
Warning 2: If your Photo Black ink reading is very very low on the chip and you switch your printer to Matte Black, you won’t be able to switch back to Photo Black. When your Photo Black is low, keep printing until it switches back to full and then switch to Matte Black!
Replacing Chips:
Using a small straight edge screw driver, pry the old chip off the cartridge as shown below under the right/lower side, then slide the top of the chip out from under the cartridge locking tab (above the chip).

Note the plastic chip base has two prongs on top. To attach a new chip to the cartridge, slide these two tabs into the channels under the cartridge locking tab as shown below, then press the bottom of the chip onto the cartridge so it snaps into place and is flat on the cartridge.

Troubleshooting & Helpful Information:
-
Use the printer on a regular basis for best function. To keep the ink moving thru the cartridges and head moist, print a small image or do a cleaning cycle at least once a week if the printer is not used regularly. It is NOT good to leave pigment ink installed in a printer that will not be used for an extended time- its best to install flush carts and flush ink for safe storage if your printer will sit unused for a month or more (see below for additional information on flushing and storing your printer).
-
Long term storage of printer: We do not recommend letting a printer sit unused with pigment inks installed. If you do not plan to use a printer for an extended period of time, it is best to remove ink cartridges, install a set of flush cartridges and flush ink from the print head by doing 3-4 cleaning cycles, before turning it off for safe storage. Store unused cartridges upright in a sealed plastic bag to avoid drying.
-
When carts are not being used (in or out of the printer), we recommend sealing air vent holes with plugs or electrical tape to keep carts moist and prevent drying. Make sure air vent holes are OPEN before printing for proper ink flow.
-
For the best results, monitor and maintain humidity levels between 40-60% in the printing area (this is based on Epson’s recommendation). Both low and high humidity can cause problems with the printer, ink and paper.
Problem: My printer does not recognize one or more cartridges.
Answer: Remove the ink cover switch and all cartridges and turn the printer off for at least five minutes. The printer will indicate “NO cartridges” after turning back on, reinstall all carts so they snap snugly into place, and put the ink cover switch back in. If you still have cartridges that are no recognized, you could have a shorted cartridge chip. Replacement chips can be found at shop.inkjetmall.com. If this is a common thing, we suggest you put your printer on a power conditioner.
Problem: When I print there are large blobs of ink on my page.
Answer: Keeping the printer clean is crucial to the function and print quality. If the capping station has waste ink and dust build up, that gets transferred to the bottom of the print head, which can cause ink to drip or smear on the paper as well as clogging and mis-firing nozzles. Keeping the capping station and wiper blade clean will help keep the print head clean and working well. Please follow cleaning instructions titled “Printer Cleaning and Preventative Maintenance” on our Tech Support Forum, in the Articles> section.
Problem: I have filled the cartridges with ink but no ink comes out when I try to print.
Answer: Make sure air vent holes OPEN, then gently tap cartridges a few times exit valve down on a folded paper towel to release any air that may be restricting ink flow. Reinstall cartridges snugly into the printer’s cartridge carriage, then do 1-2 cleaning cycles and print a nozzle check. If there are still missing nozzles, wait about 15 minutes then do another cleaning cycle and print a nozzle check. The exit chamber inside the cart MUST be at least 1/2 filled with ink for proper flow. If the exit chamber does not contain ink or is less than 1/2 full, tape air vent closed and refill the cartridge using the vacuum method.
Problem: When I print there are lines on the paper.
Answer: Lines on the paper are often caused my missing or mis-firing nozzles (called “banding”), but mis-alignment can also cause lines in the print. Print a nozzle check to make sure all positions are fully and correctly printing. If there are missing or mis-firing nozzles, make sure the air vent plug is removed and exit chamber is at least 1/2 filled with ink, then gently tap cartridges a few times, exit valve down on a folded paper towel to force the ink down and release any air that may be restricting ink flow. Reinstall the cartridges snugly into the printer’s cartridge carriage for a tight seal then do 1-2 cleaning cycles before printing another nozzle check. If all nozzles are printing and in the correct positions (not mis-firing), then align printer to the paper thickness you’re printing on. Keeping the printer clean will help keep the printer in top working condition, so we recommend cleaning the capping station and wiper blade regularly and bottom of the head as needed, by following the printer cleaning instructions on our support forum.
If you continue having problems or have additional questions, please refer to our Inkjetmall Support Forum.