Large Format Chip Replacement
Large Format Chip Replacement for 4000, 7600/9600, 4800/4880, 7800/9800, 7880/9880
Chips occasionally go bad and need to be replaced. When the printer gives a cartridge error which is not resolved by resetting the chip, this usually means the chip has shorted out and is no longer read by the printer. We recommend everyone have a set of spare chips on hand to be prepared if a chip needs to be replaced, which is very quick and easy to do. Chips from Epson OEM cartridges can also be used on refill cartridges, and can be reset using the chip resetter. The cartridges themselves are very robust and will likely last the life of your printer.
New chips already read full, so do NOT need to be reset. Pry the current chip off the cart using a straight edge razor blade or something similar, then attach the new chip in place of the old one using a small piece of double sided tape (don’t glue chips into place). Make sure gold contacts are facing the front of the cartridge (same direction as the one you removed). Chips are sensitive to static, so against what you may think, it is best to handle them with clean, dry hands instead of wearing cotton gloves. With the new chip in place on the cart (with a small piece of double sided tape on the back of the chip), press straight down with your clean + dry finger or thumb to secure the new chip to the cartridge- making sure it sits flat/flush in the chip area of the cart, and nothing is on the chip contacts that could interfere with the chip read.
Warning: Inserting a cartridge into these printers with a loose or missing chip will permanently damage the internal wire sensor. These sensors are cheap (available at compassmicro.com) but are a pain to actually replace as they require a removable of the ink-bay to get at them. Make sure the chip is securely attached before inserting into the printer.
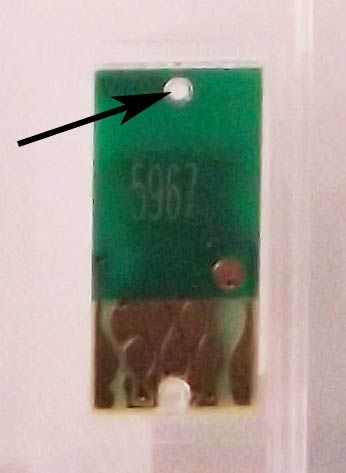
Large Format Chip Replacement for the 7900/9900, 7890/9890, and 7700,9700
Chips occasionally go bad and need to be replaced. When the printer gives a cartridge error which is not resolved by resetting the chip, this usually means the chip has shorted out and is no longer read correctly by the printer. We recommend everyone have a set of spare chips on hand to be prepared if a chip needs to be replaced, which is very quick and easy to do. The cartridges themselves are robust and will likely last the life of your printer.
New chips already read full, so do NOT need to be reset. Carefully cut the top off the plastic nub located at the top of the chip, as indicated in the photo on the left. Gently pry the current chip off the cart using a straight edge razor blade or something similar. Attach the new chip in place of the old one using a small piece of double sided tape (don’t glue chips into place). Make sure gold contacts are facing the front of the cartridge (same direction as the one you removed). Chips are sensitive to static, so against what you may think, it is best to handle them with clean, dry hands instead of wearing cotton gloves. Some people wear anti-static bands when working with carts/chips to help avoid damage. With the new chip in place on the cart (with a small piece of double sided tape on the back of the chip), press straight down with your clean + dry finger or thumb to secure the new chip to the cartridge- making sure it sits flat/flush in the chip area of the cart and nothing is on the chip contacts that could interfere with the chip read. The main reason why chips do not make contact correctly inside of the printer is because the chip has slid "back" away from the front of the cartridge when the cartridge is inserted into the printer. If you suspect this is the case, take the cartridge out, push the chip firmly forward, and tape over the back of the chip (not over the copper contacts) to secure it. This should fix the issue.
Large Format Chip Replacement for the SureColor P6000/P8000 and P7000/P9000
Update now includes EU region printers!
SureColor printers sold in North America and in Europe behave differently than the same models sold into Asia. China is much more strict about consumer protection laws and efforts by printer manufacturers to prevent consumer choice in ink supplies. It is much easier for Chinese consumers to repair their own printers and ink cartridges or choose alternative ink supplies than it is for North Americans and Europeans.
When an ink cartridge is inserted into a North American or EU region P6000, P7000, P8000, P9000 printer, the serial number of the chip is recorded and saved into a database located on the main board of the printer. Further, the database continues to record the percentage of ink remaining for each of the chip serial numbers (even though the percentage of ink remaining is recorded directly onto the chip.)
This prevents both chip resetting as well as using a second version of the same chip serial number. This makes it quite difficult to repair your own printer by using refillable cartridges or using remanufactured cartridges. For example, a popular method for reusing cartridges (rather than throwing them away) is to refill the cartridge with ink and resetting the chip. Resetting chips is not an option in North American and European region SureColor printers. They have been designed to prevent reUsable ink supplies. In general:
If a chip has been exhausted and its percentage of ink remaining has fallen to zero, it can not be replaced with a chip with the same serial number or the printer will not operate.
If a chip has not been fully exhausted, a chip with the same serial number but with a higher percentage of ink remaining can not be used or the printer will not operate, and that serial number can never be used again in that individual printer even if the first chip matching the internal database is inserted.
We offer SC-P large format chips in series. It is the consumer's responsibility to keep a log of what series/serial chips they have placed in their printer previously so they do not order the incorrect chip. We also keep a log based on sales so if need be we can look up your history.
Replacement Procedure:
-
Make sure that you are in a static free area. Increasing humidity can help and even wearing an antistatic wrist strap can also help. Any static that sparks the chip can short it out and cause it not to work. Make sure you hands and work area are also clean!
-
Pull the old chip off the cartridge and put to the side (not it's series number!).
-
Remove the replacement chip from its envelope and make sure the chip is marked with a series # that you have not used before in the printer.
-
Place the cartridge so that the label is right-side up with its arrow pointing towards the front (chip base plate) of the cartridge.
-
Take your thumb and firmly press the edge of the chip base plate down (see photo). You will hear a snap as the chip baseplate is locked into place.
-
Take your chip and place the front grove onto the baseplate groove post (see photo) and the back hole over the baseplate hole post.
-
Tape over the back of the chip to secure it in place on the cartridge. Although this is not necessary for good functionality it ensures that chip does not fly off when you agitate the ink cartridge in weeks and months to come.
Warning: Inserting a cartridge into these printers with a loose or missing chip will permanently damage the internal wire sensor. Our products are NOT warranted against user-error damage to the printer! These sensors are cheap (available at compassmicro.com) but are a pain to actually replace as they require removal of the ink-bay to get at them. Make sure the chip is securely attached before inserting into the printer.