7800, 9800, 7880, 9880 Refillable Cartridge Instructions
The instructions below describe how to fill and use refillable cartridges, in general terms, for large format printer models. Filling and using these cartridges is easy, provided you are prepared before you begin and follow the instructions below. High quality ink is available in various size bottles from this website.
Video Instructions (skip to view the written ones):
Background Information to Read Before Beginning :
Cartridges are sold individually, as sets and with ink bottles. Refer to the item description to know what is included with the specific item you purchased.
1. Before beginning, make sure to have the following items on hand:
-
Ink bottle(s), which can be ordered from www.inkjetmall.com.
-
Empty refillable cartridge(s). Each cartridge must have a fill hole plug and chip attached on the top.
-
Funnel(s) for filling and refilling cartridges with ink.
-
A pair of thin rubber gloves to wear when filling or refilling cartridges.
-
A slip-tip syringe and priming tip needed for priming cartridges with ink before installing into the printer.
-
A table or work surface large enough to hold cartridges and ink bottles. If you wish, cover the table with newspapers or a plastic sheet to protect it from ink spills.
-
Work near a sink for easy cleanup.
-
A roll of paper towels.
-
A bottle of Windex or other glass cleaner.
-
Printer: before you begin, verify all positions in the nozzle check pattern are fully printing and your printer is in perfect working order. Fix any printing related problems before proceeding.
-
A chip resetter is needed when a cartridge reads empty to make it read full again- but is NOT necessary when installing new cartridges. Chip resetters are available thru Inkjetmall.
2. Treating and avoiding ink spills:
-
If ink spills, wipe it up as quickly as possible. Blot ink with paper towels, then spray glass cleaner and wipe with a paper towel.
-
Ink spilled on clothing or other fabric, on carpets or porous surfaces like wood or unglazed ceramic tiles will likely cause permanent stains. Keep this in mind as you choose the workspace area and clothing you wear.
-
If you spill ink on the outside of a cartridge during filling, wipe it off with a paper towel, rather than rinsing, to avoid getting water in the cartridge.
-
If you spill ink on your skin it will temporarily stain. Clean ink off with water and an abrasive soap, such as “Lava” soap or with regular soap using a rough sponge. Thin rubber gloves are recommended when filling ink cartridges.
Procedure for Filling & Priming Cartridges:
-
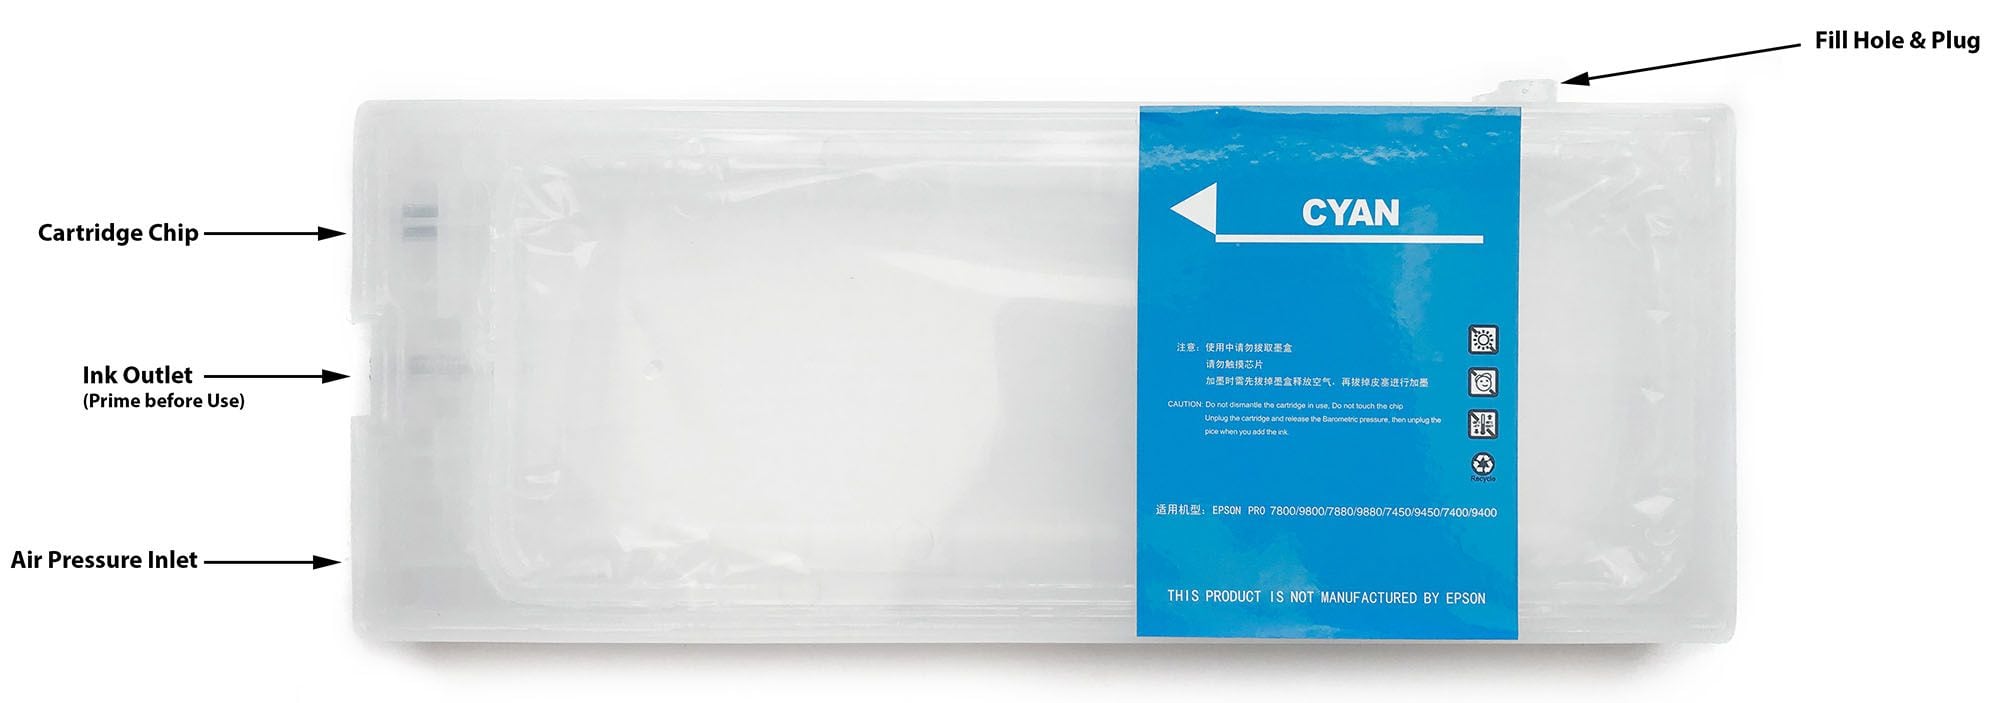
Please refer to the photo on top of page 6 to familiarize yourself with the cartridge parts before filling. If you are filling cartridges for the first time, unwrap them and inspect them for damage. Contact InkjetMall if you suspect a cartridge is damaged. Make sure the chip is securely attached flat and straight on each cartridge. Also, make sure there is a silicone plug in the top of each cartridge. If not, please check inside the cartridge wrapping before you discard it. Verify you have the correct black cartridge necessary for the Photo or Matte black ink you will be using. For Piezography inks, you can use whichever black cartridge that your printer is currently using to avoid having to do the “black ink change” procedure. NOTE: the Matte Black cartridge number ends in “8” and the Photo Black cartridge number ends in “1”.
-
Arrange the ink bottles on your work surface. Do not open them yet. If using Piezography ink, make sure to know what shade to pour into which color position cartridge- an info sheet that explains shade placement is included below. We recommend writing the ink shade # on each cartridge by following the chart at the bottom of this page- this will make for easy refilling in the future and avoid accidental ink mixing.
-
Put on your gloves.
-
Place a cartridge upright and remove the silicone plug from the filling hole on top. Select the correct bottle of ink for the cartridge, and shake it gently. Unscrew the cap, and remove the silicone nipple or foil seal from the bottle.
-
Insert a funnel into the cartridge fill hole. Support the funnel and cartridge with one hand. Pour ink with the other.
-
Fill the cartridge to the “Max” line on the end of the cartridge. If your cartridge doesn’t have a “Max” line, keep the ink level about 1/2” from the top of the cartridge. Do not add more ink than this, as it may cause problems during printing.
-
Repeat the above steps with remaining cartridges. After filling cartridges with ink, funnels can be rinsed with water, air dried and used for later refilling. If the funnels stain and can’t be cleaned to a “new” condition, this will not contaminate your inks. However, introducing even small amounts of ink from one color bottle into another color bottle will contaminate your inks, so be careful of this.
Prime Cartridges Before Installing into Printer:
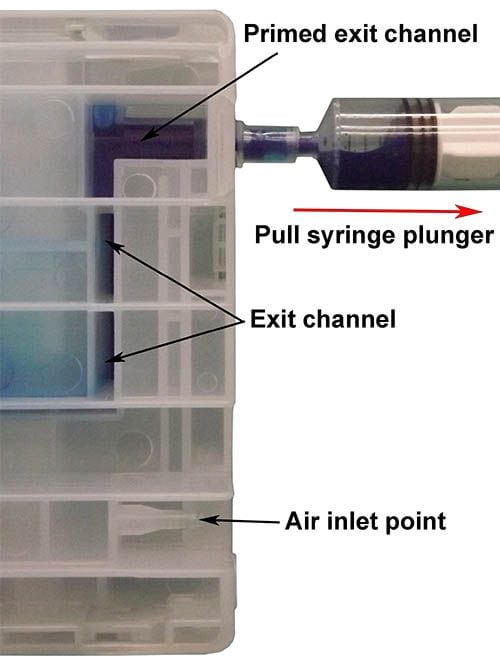
After filling a cartridge with ink, the exit channel must be primed with ink before installing into the printer for proper ink flow. To prime a cartridge with ink, place it upright on a table with chip side up. Remove orange plug from air inlet point. With priming tip attached to the slip-tip syringe, insert the priming tip straight into the exit valve to depress the spring and open the valve. Pull the syringe plunger to draw ink up the exit channel until air is removed and some ink enters the syringe. Remove the syringe by pulling it straight out of the exit valve. Now the cartridge is ready to be installed in the printer.
Installing Cartridges into the Printer:
-
NOTE: When installing cartridges for the first time in your printer, if you are using ConeColor ink and wish to switch from Photo Black Epson to Matte Black refillable, or from Matte Black Epson to Photo Black refillable cartridges, you must first run a “black ink change” in order for the printer to accept the set of cartridges. Refer to your printer manual for information on this and run the black ink change before proceeding. *Refer to the Troubleshooting section on page 10 for more information*
-
Occasionally cartridges don’t have a tight seal with the printer, allowing air to escape between the printer and cartridge. If this occurs, slide one of the included o-rings over the “air inlet hole from printer” (E in photo on page 6), for a tight seal between the cartridge and printer. Make sure to push cartridges into printer all the way for a good connection between the cartridge chips and printer sensors.
-
Before installing the cartridges into the printer, prime each cartridge with ink following directions above. If a cartridge is not primed before installation, air will enter the printer’s ink line. An air bubble can cause interrupted printing or a poor nozzle check, but is usually fixed with a few cleaning cycles. After priming and adding an O-ring, install the cartridges into their appropriate slots in the printer. Lower the cartridge levers, and turn the printer on if needed (cartridges can be installed with printer power on or off). NOTE: With the x880 models, the printer will tell you non-Epson cartridges are installed and asks if you want to continue (scroll down to read the entire message). Keep pressing next until the printer reads ‘ready’. All x880 printers made after June 2009 will display this message at every start up, every time a new cartridge is inserted, and every time a cartridge is reset and reinstalled.
-
Purging the system: ConeColor K3 inks provide such a good color match to Epson UltraChrome K3 inks; therefore, purging the Epson inks from your printer is optional and may be skipped if desired. If you do choose to purge your printer, run three “Power Cleaning Cycles,” as described in your printer manual. Be sure to have a spare maintenance tank on hand (we recommend resetting/reusing them!), if yours is nearly full. Piezography inks are compatible with Epson inks, although some color staining can occur when switching from color to Piezography inks. To avoid color staining, we recommend using flush cartridges in between the two inks, but flush is not required. If flush cartridges are not used and color staining occurs, usually a few cleaning cycles clears this up. We recommend flushing the printer’s internal ink system with a set of flush cartridges if switching from any ink other than Epson, as this is the only ink we have tested and know our inks are compatible with, though other inks may not be compatible.
-
Verify all positions are fully printing in the nozzle check pattern.
Piezography BW Ink Setup & Instructions:
For full documentation on how to install Piezography for every printer please go to https://piezography.com/technical-support/ and look for your printer model.
Refilling Cartridges:
Monitor ink levels in the cartridges and refill before the ink reaches about 1” from the bottom to avoid introducing air into the ink lines of your printer. Use the necessary steps from the procedure above for refilling cartridges. Always shake the bottles before filling or refilling cartridges. Fill each cartridge to the “Max” line (or 1/2” from the top) with the correct ink, securely replace the silicone plug in the ink fill hole, reset the chip (see instructions on next page), gently shake the cartridge to get all ink in suspension, tilt the cartridge forward to ensure the exit channel is filled with ink, then reinsert cartridge into the printer and lower the cartridge locking lever.
Resetting x8xx chips (only after use!):
The photo below shows the chip resetter next to a cartridge chip. Note that the resetter has seven pins and the chip has seven rectangular gold pads. To reset a chip, you must put each of the seven pins in contact with a gold pad on the chip. To properly align the resetter to the cartridge, flip the resetter over and onto the cartridge as indicated by the arrow below.
When the resetter is pushed against a chip, make sure the tab on the resetter fits into the slot next to the cartridge chip (see photo below). Slide the resetter upwards, alongside the cartridge, so that it pushes against the top of the slot in the cartridge, then press the resetter against the gold pads on the chip – the pins on the resetter are spring loaded and will depress slightly when pushed against the chip. As soon as you have made contact between the resetter and the chip, a red LED will flash several times while the chip is resetting. When the chip has been reset the light will turn solid green. After seeing the green LED, separate the resetter from the cartridge. Your cartridge chip has now been reset and is ready to use.
NOTE: Chips are fragile, sensitive to electrical shock, and can short out. We recommend resetting and reusing them whenever possible, but suggest having a set of replacement chips on hand if needed. New chips can be attached in place of the old chips by following instructions on page 4. Replacement chips can be purchased from www.inkjetmall.com.
Attach New Chip to Cartridge:
Chips occasionally go bad and need to be replaced. When the printer gives a cartridge error which is not resolved by resetting the chip, this usually means the chip has shorted out and is no longer read by the printer. We recommend everyone have a set of spare chips on hand to be prepared if a chip needs to be replaced, which is very quick and easy to do. Chips from Epson OEM cartridges can also be used on refill cartridges, and can be reset using the chip resetter. The cartridges themselves are very robust and will likely last the life of your printer.
New chips already read full, so do NOT need to be reset. Pry the current chip off the cart using a straight edge razor blade or something similar, then attach the new chip in place of the old one using a small piece of double sided tape (don’t glue chips into place). Make sure gold contacts are facing the front of the cartridge (same direction as the one you removed). Chips are sensitive to static, so against what you may think, it is best to handle them with clean, dry hands instead of wearing cotton gloves. With the new chip in place on the cart (with a small piece of double sided tape on the back of the chip), press straight down with your clean + dry finger or thumb to secure the new chip to the cartridge- making sure it sits flat/flush in the chip area of the cart, and nothing is on the chip contacts that could interfere with the chip read.
Troubleshooting & Helpful Information:
-
Shaking ink bottles and cartridges: over time pigment particles can settle, so regular shaking is needed to keep inks in solution. The best time to shake the bottles and cartridges is when refilling the cartridges. If a printer is not used for a few weeks pigment will settle in the cartridges and ink lines- to fix this, agitate the cartridges and perform 2-3 power clean cycles. To agitate ink cartridges, remove and gently shake the carts by tilting forward and swishing around, then reinstall into the printer. Print a nozzle check to confirm all positions are printing, then resume printing as normal.
-
Use the printer on a regular basis for best function. To keep ink moving thru the ink lines and head moist, print a small image or do a few cleaning cycles at least once a week. It is not recommended to leave pigment inks installed in a printer that will be unused for an extended period of time. It’s best to remove ink by installing a set of flush cartridges and running an Initial Fill Cycle to purge ink from the lines, dampers and print head. This will allow for safe long term storage.
-
7880/9880 Matte Black mode: Chips on 7880/9880 refill carts are programmed to be universal, so they can be used in any position of your printer (therefore you need to be EXTRA careful to install cartridges in the right positions). When a printer is in Matte Black mode, it can sometimes get confused by the refill cartridge chip. Since chips are programmed with both MK and PK info, you will have all (matte and gloss) media type settings available in the Epson print driver, no mater which cart or ink you’re using (make sure to select the appropriate settings for the ink you’re using). If you want your printer to remain in MK mode, then you will need to attach an Epson MK chip to the refill cart, by following the chip replacement instructions on page 9.
-
Storage of cartridges out of the printer: If you want to take cartridges out of the printer for a long period of time, you should store them upright, with pressure released and fill hole plug securely in place to prevent evaporation and spills. A printer should never be left sitting for extended periods of time without cartridges installed.
-
Monitor and maintain humidity levels between 40-60% in the printing area. Both low and high humidity can cause problems with printers, inks and papers.
-
The resetter LED flashes red, but doesn’t turn green: pull the resetter off the cartridge and try resetting it again. The pins are probably making poor contact.
-
Watch ink levels in the cartridges: refill a cartridge before ink level gets below about 1-2” from the bottom. Be sure to always refill a cartridge all the way before inserting the fill hole plug, then prime cartridge before reinstalling into the printer. Reset the chip to read full whenever a cartridge is refilled with ink.
-
When to reset: only reset the chip after, or immediately before refilling a cartridge. Do not reset the chip on a less than full cart, as you might run the cartridge dry and draw air into your printer’s internal ink lines (which can interrupt ink flow).
-
Printer gives “pressurization” error: these printers use pressurized air to “push” the ink out of the cartridges. The printer can sense an air leak in one or more cartridges and it will not operate if it does so. The printer cannot determine which cartridge is leaking air. If you see a pressurization error, check the fit of silicone plugs in all the cartridges. Use of O-rings on cartridge air inlet points help create a tight seal between the printer and cartridges, for proper pressurization and ink flow.
-
Printer gives a “wrong cartridge” or “cartridge error” message: be sure cartridges are installed in the correct positions and securely locked into position, for tight connection between the cartridge chip and printer’s chip sensor for good read. Make sure there’s nothing on the chip blocking the read and reinstall the cartridge into the printer. Printer gives “set ink cartg” error: this usually means the printer doesn’t have tight contact with the cartridge chip, or the chip is shorted out and needs to be replaced.
-
Unable to print a perfect nozzle check pattern after installing new cartridges: occasionally when installing new ink cartridges, the print head will flood with ink and a perfect nozzle check pattern may be difficult to print. Running additional cleaning cycles can make this problem appear worse, rather than better. Wait about 30 minutes to allow ink to settle, then print a nozzle check. Don’t do excessive cleaning cycles if the nozzle check isn’t perfect.
-
Unable to print a perfect nozzle check after use of printer: each time you remove a cartridge from the printer you can introduce a small bubble of air into the ink tube. This air bubble slowly works its way thru the ink line and may interrupt ink flow when it reaches the damper or print head. If standard cleaning cycles don’t fix the problem and if cleaning the capping station doesn’t fix the problem, then run one or two high powered cleaning cycles to push the air bubble out of the print head. Before putting a cartridge into the printer, prime the exit channel with ink. If the cartridge is not primed before installing, air will enter the printer’s ink line before ink starts flowing. You can open the printer’s lid and examine the length of ink tubes, make sure they are all filled with ink and there are no sections of air inside.