Direct to Plate Photogravure, August 12-15 2024
Learn Piezography-quality intaglio photogravure direct-to-plate printing.
SYLLABUS WHAT TO BRING ACCOMMODATIONS, HOURS, & INFO Cancellation Policy
Registration Fee: $450, Total Fee: $1750. One Seat Remaining!
Workshop Overview
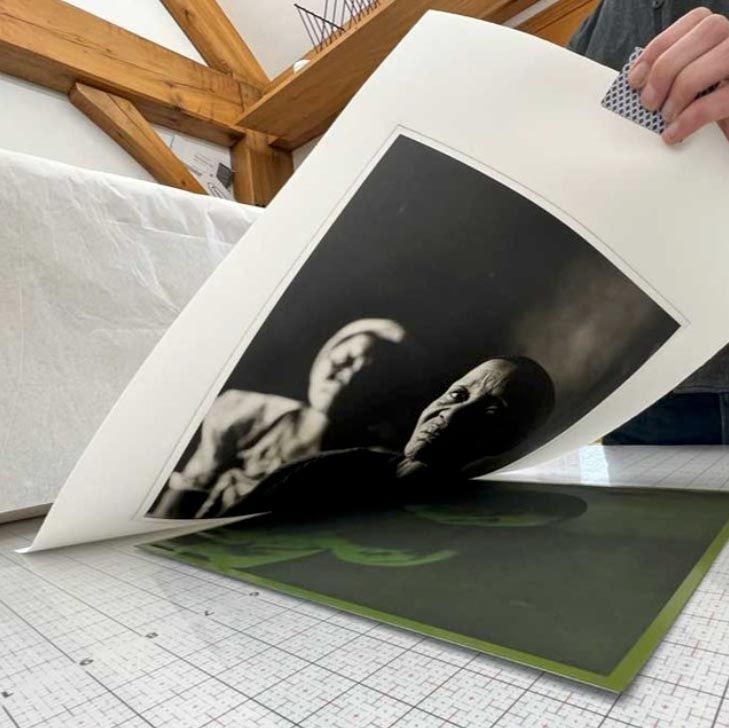
In this workshop we will teach you how to produce photogravure plates with the Piezography three-gradated shades inkjet direct-to-plate process using highest-fidelity Green Mountain Plates and exposed with the unique verifiedUV system. These highest fidelity photogravure plates rival and can surpass copper plate photogravure and are much higher in fidelity than two exposure processes.
No experience in inkjet printing, Piezography printing, or gravure printing is necessary to take the workshop, but it always helps to have a bit of knowledge in one or more of these fields!
The concept behind this workshop is that the results you get at Cone Editions can be duplicated in your own studio. The same system that you will be using at Cone Editions is available as a package to bring back to your own studio if you choose. Or you can just come to the workshop to maximize your time making photogravures of your images - and have a blast! You can even choose if you want to have Cone Editions make your photogravure plates in the future and use the workshop to learn what you can do to get the best out of your images while learning new studio techniques to get the best out of the plates.
The Piezography Direct-to-Plate photogravure process is calibrated to produce prints of an intaglio press that match your screen display. The system components are a supported professional inkjet printer, 1 or 3 shades of Piezography monochrome inks that are made in-house at Cone Editions, and software and settings to print the calibrated results directly onto Green Mountain plates.
The three inks produce a continuous tone effect in which the final prints appear dotless. The single ink process produces what appears to be a fine aquatint. While the three ink process can produce both, the single ink process is the most simple conversion that still allows the printer to produce color prints or regular Piezography prints and digital negatives. The Green Mountain Plate is exposed with a very strong 365nM UV exposure system called verifiedUV™. All of these units that we build here in Vermont are calibrated to the 'Cone Standard' so that pre-set exposures can be used. The plates are processed in plain tap water and cured by re-exposing to UV. The plate can produce 10s or 100s of edition prints. There is no requirement for film, mezzotint screen, or vacuum frame. As a result, a Piezography method photogravure plate is absent of the mechanical nature of a plate made with two-exposure method, is more continuous tone in nature, and has much higher fidelity.
The printers we are supporting with this season’s workshops are the Stylus Pro 3880, 7880, 9880, SureColor P800, Stylus Pro 4900, 7890, 7900, 9890, 9900, SureColor P6000, P7000, P8000, P9000. Your printer, should you decide to bring this back to your own studio, should have at least one or three working ink channels that can produce a perfect nozzle test. If the printer is currently being used to print color, only the MK needs to be changed to Piezography DTPG ink for the one ink method. Both methods are taught in the case you have a printer that has three working channels. Does this mean you can use a printer that has an imperfect print head? Yes! It will be part of the workshop to teach you a strategy for obtaining a low-cost printer for this purpose.
Read about our initial development of the process here
A Few Things You Get to Learn . . .
A new and fast way of photogravure plate production. Imaging for photogravure. High end inkjet printing. Etching ink mixing. Etching paper handling. Ink wiping for photopolymer. Plate handling. Editioning. Print drying. Deckle cutting and curating and print packing/handling. Etching studio setup and best practices. How to do this in your own studio.
What to Expect . . .
This is a hands-on workshop. You are going to get inky! We told you already to bring an apron or you can purchase on of our studio aprons. We first teach by demonstration, and then we guide each individually in the process, and then we supervise as you print on your own. And everyone learns to print on their own quite quickly. And unlike other workshops where you may spend a full week to only get two plates and four prints made, in this workshop you may well walk out after four days with 7-10 plates and 14-20 prints. Each attendee will receive their own package of plates to use as they wish.
Will you be able to bring this process home to your own studio? Yes! Although it is no longer possible to purchase an EPSON printer in North America that can be used with 3rd party inks, the workshop will teach the conversion of late generation EPSON printers that can be obtained from the secondary market. Our process uses only three special monochromatic inks. This means that a supported EPSON printer needs only to have three working ink channels. The rest can be reserved with PiezoFlush to keep them for future needs. The used printer market has plentiful cheap (often free) & available printers with missing ink channels or partially clogged print heads that are perfectly suitable to be used as direct-to-plate photogravure printers.
If you have one of these existing printers that you are using for Piezography you will already have everything you need installed in the printer for the single ink process. If the printer is currently being used for color printing, you will need only replace the Matte Black with a much darker and more opaque black ink (it produces fantastic color prints!)
Because we are supporting a very particular range of printers, the software you obtain in the workshop is easily transportable to the same equipment in your studio. There is no reinventing the process on your own or trouble-shooting why your results are not the same as when you were at the workshop. If you want to do this in your own studio, you can purchase the necessary inks, software, plates and UV exposure systems used in the workshop.
However, if you just want to come to a workshop to make photogravures you are more than welcome to attend without any intentions to bring our process back to your own studio. And it is also a perfect opportunity to see what this process can do to your own studio and rely on Cone Editions Press to make plates for your own studio. This way you benefit from the teachings but do not have to deal with the technology. This workshop aims to be all things for all printmakers.
Workshop Syllabus
Day 1: Necessary Knowledge
A little knowledge goes a long way. A lot of knowledge goes further. The right knowledge is essential to a good start as well as advanced image development. This day is devoted to making sure your first step is on the correct path. Today after introductions, goals and expectations discussion, we will give a tour of the studio and orient you to the lay of the land (studio encompasses several levels and floors, we will demonstrate the entire process to you from beginning to end. We'll be working in the imaging studio, the inkjet studio, the wet process lab, and the intaglio studio. We'll walk you through the entire process today, and while it is fresh work with each attendee to produce their first photogravure plates.
Introductions of workshop attendees and instructors and goals and expectations.
Cone Editions Press studio tour.
Introduction in the classroom with preliminary questions and answers about the software, hardware, wet process and hard process tools required to make Piezography Direct-to-plate Photogravures.
Demonstration of paper preparation, and wet pack paper soaking method
Demo of the Direct-to-Plate printing workflow, exposure, plate processing, drying, and hardening.
Demonstration of ink mixing, hand wiping, paper calendaring, and pulling a print.
Print drying and flattening techniques.
Installation of Piezography Special Gravure Class Edition software and curves set for supported printers, QTR and Print Tool, Piezography ICC profiles, and Documentation onto each workshop participant's laptop.
A brief look at the types of images that are well-suited to the process so you can spend your first evening after the workshop selecting images from your own laptop to begin working with on Day 2.
Day 2: Necessary Practice
I know I can fly! Just a little reminder here and there - but it’s time for less talking and more rocking. Today participants begin working in the process with supervision. The first part of the day is an intaglio inking and wiping review and then attendees will hand ink and wipe and print their first plates. The rest of the day is spent making more plates and printing.
Preparing Images for printing.
Preliminary imaging instruction and techniques for photogravure.
Color to grayscale conversion techniques in Photoshop, LightRoom and Capture1.
Print to Screen Display and Calibration.
Saving Images to Print.
Participants will print their saved images directly to plates.
Participants will expose, process, dry and harden their photogravure plates.
Participants will trim and prepare the corners of their plates.
Participants will hand ink and wipe their plates and make their first proofs!
These proofs will be pinned to the studio viewing wall for drying and an end of the day discussion about tomorrow’s expectations.
Day 3: Dig a Little Deeper
Now take what you’ve learned and go forth and make prints! Today it comes together in the form of photogravure prints. We’ll roll out different inks for you to try and take notes on the precise ink recipes. Some may wish to try different papers. But the best experience will be reprinting plates as this is where the real learning on press takes place. We’ll be working with each individually if desired. This day is a little special in that it’s our longest day. Staff leaves the studio fully in the hands of attendees at 5pm. At about 7:30pm attendees and their traveling partners are invited to an evening meal, libations, and an interesting evening of conversations and sharing. What we love best is the attendee confidence in running the house. Took a scant three days to turn out direct-to-plate photogravurists!
Reintroduction to inking and wiping and intaglio press procedures.
Participants have the entire day to make plates and print under guidance.
Participants will also begin to experiment with different inks adding Warm blacks, Cool blacks or other colors into the mix.
The goal is self sufficiency in our studio so that at 5pm you have run of the studio unsupervised while we begin to plan our evening dinner party - usually a huge paella under the pavilion!
We will be preserving todays prints to put into the flattener
Day 4: Workflow & Wrap-up
Today is the technical day. The prints are all in the dryer. Participants learn from the most basics of ink cartridge filling, printer conversion strategies, software installation and usage, linear vs contrast match printing, exposure calculation, open bite testing, the linear curve, the darkroom, the press room, paper tearing and curation. A questions and answer session to include a a "prescription" of items each attendee needs to get set up in their own studio. A special workshop discount is available for materials and exposure hardware purchased.
At the end of the day attendees are encouraged to choose a few prints that show their growth over the past four days for a group discussion of their work. And then its time to pack up your plates and prints to take home with you.
Just so you know, you have a choice of continuing to make prints in the studio on your own this day (as long as you pin them to the wall for rapid drying) if you have no intention of bringing this process to your own studio or learning how to convert printers to the Piezography Gravure ink set and use of the Piezography Professional Edition Toolkit. If you're here just for the opportunity to see your work in the highest standards of photogravure, we are not going to drag you into the classroom today. It is our goal in 2024 to make sure everyone's goals are met whether purely aesthetic or technical mixed with aesthetics!
What to Bring
A Laptop (Macintosh preferred): The studio does not provide computers. You should bring a laptop. But, the studio does provide calibrated displays which can be connected to your laptop! That make’s things easier especially when using the studios systems which are designed to match to display. We have enough USB-C/Thunderbolt v2 and v3 adapters for all laptops (aka any Mac laptop from 2012 onwards) but if you have a non-standard computer bring a connector that goes from your laptop and connects into the female "DisplayPort" fitting on the monitor.
Digital Images and original work: Bring a hard-drive of digital images (at least 10 to work on). Ideally bring images that you've printed before and know well and bring raw images that you want to work on from scratch. Bring some film too if you are a medium or large-format photographer as we always do a bit of drum scanning for people if they want to utilize film originals later in the week. If you are not doing "photo" printing that is fine. As long as you have some way to work with your images digitally that is all that is required. Remember though, this is a monochrome class. If you only have color images that is fine, we'll be converting them to black and white for printing.
Install the required software: We require Photoshop be installed on your computer for some of our demos. Lightroom is a good alternative as well but there are things that Photoshop can still do today that Lightroom can't. If you are normally a Photoshop person that is fine. If you a Lightroom person bring a laptop with both installed. Install Excel (it does not have to be activated) if you intend to learn the Photogravure calibration process. Everything else will be provided to you!
Accommodations, Hours, and Info
LOCATION AND HOURS:
The studio is located at 17 Powder Spring Road, Topsham, Vermont 05076. It is registered with Google Maps and you can trust Google directions to our studio. The studio is open to students, and instruction is provided from 12:00 PM - 5:00 PM. Your instructor sets time for demonstrations, a mid-day snack, critiques and clean up. On Wednesday we try to have a paella party in the Summer when weather permits. In the Fall we try to do something similar. But, we do keep the studio open later on Wednesdays. Plan for staying a bit later on Wednesday to share, eat, or get a bit more printing done! Your traveling partners are welcome to the Wednesday night party and can arrive anytime after 5:00pm but we tend not to eat until 7:00-7:30 and plan to stay late into the evening as the sun sets later this far North in Vermont!
TRAVEL:
Our nearest airport (75 minutes) is Burlington International Airport (BTV) in Burlington, VT. Other airports are Manchester-Boston Regional Airport (MHT) (130 minutes) and Boston-Logan (180 minutes). There are car rentals as well as private taxis and shuttles between the airport in Burlington, VT and East Topsham.
LODGING:
The amount of lodging near us is very limited. You must make reservations early if you want to be within walking distance of our studio. There is a small B&B with a friendly owner and excellent breakfast and 5 minute walk: http://www.vermontbackintime.info/
Rest Haven is our preferred Inn as it is the closest Inn to our studio and most our attendees stay there which makes it a great gathering place and ride sharing location. They are located in West Topsham (an 18 minute drive) They can provide meals. They have five different guest rooms. Please contact Angela Piletz
[email protected] (585) 749-0015
Lake Morey Resort (25 minute drive)
Gibson House Bed & Breakfast (30 minute drive)
Millstone Inn, heart of the old Websterville granite quarries (25 minutes drive)
Firehouse Inn, an old firehouse converted into a restaurant and inn (25 minutes drive)
Maplecroft Bed & Breakfast (25 minutes drive)
The Lyme Inn (40 minute drive)
Dowd's Country Inn (40 minute drive)
Breakfast on the Connecticut Inn (40 minute drive)
Norwich Inn and Brewery (40 minutes drive)
Betsy's Bed and Breakfast (45 minutes drive)
The Inn at Montpelier (45 minutes drive)
Capital Plaza Hotel (45 minutes drive)
Hannover Inn (upscale and fine dining) (45 minutes drive)
Six South Hotel (45 minutes drive)
Stillwater State Park (camping) (20 minutes drive)
Cancellation Policy
Because these workshops are small and your cancelling adversely affects the program, Cone Editions has both a very generous and a very strict cancellation policy.
We collect a deposit payment if you sign up more than 30 days in advance of a workshop. All workshops must be fully paid 30 days in advance.
If you withdraw more than 30 days prior to the start date of your workshop, all payments made will be refunded, minus a cancellation fee equal to 50% of the deposit.
If you withdraw between 30 and 15 days prior to the start date of the workshop, all payments made will be refunded, minus a cancellation fee equal to 50% of the workshop tuition, unless Cone Editions or you can supply a replacement, in which case you will receive a full refund minus a cancellation fee equal to 50% of the regular deposit amount associated with that workshop.
If you withdraw less than 15 days prior to the start date of the workshop you will receive no refund, unless Cone Editions or you can supply a replacement, in which case you will receive a full refund minus a cancellation fee equal to 50% of the regular deposit amount associated with that workshop.
There are no exceptions to these policies and Cone Editions is not responsible for cancellations due to medical or other emergencies. Should Cone Editions have to cancel a workshop, all fees and deposits are refunded in full or may be transferred to another workshop within 12 months. Cone Editions is not responsible for reimbursement of non-refundable airline tickets in the event of a workshop cancellation. We strongly recommend that you purchase trip cancellation/travel insurance.