Table of Contents
- Overview
- Dynamic Luminance Detection
- Variable Patch Targets
- Special Averaging Support
- Measurement Smoothing
- Falses Correction
- Start Points
- Channel Curve Smoothing Tutorial
- Variable Ink Limiting
- Target Luminance Calibration
- Contrast Tweaking
- Channel Remapping
- Curve Blending
- Curve Inversion
- Save a Copy
- Physical Ink Mixing and Blending
- Repurposing Clogged Printers
- Ink Placement Charts
- Initial Fill Instructions
- 1400/1430/1500 Instructions
- P400/R1900/R2000 Instructions
- R3000/P600 Instructions
- 3800/3880/P800 Instructions
- 4000 Instructions
- 4800/4880 Instructions
- 4900 Instructions
- 7600/9600 Instructions
- 7800/9800 7880/9880 Instructions
- 7890/9890 Instructions
- 7900/9900 Instructions
- P6000/P8000 Instructions
- P7000/P9000 Instructions
Piezography Manual
Getting Started with Piezography
The System
Piezography is an add-on replacement system for a select range of EPSON Pro and Photo Stylus printers. It replaces the OEM color inks & color management system with a proprietary Piezography system of gradated shades of monochromatic ink and specialized media profiles. Piezography’s sole purpose is to greatly exceed the capabilities of the OEM system when producing black & white photography. It does this by eliminating compromise. Piezography goes further than besting Epson’s ABW system. It also exceeds what is possible in traditional photographic printing by producing a longer density range in the Print than is available from silver, carbon, or the noble metals of platinum & palladium. It produces significantly better shadow and highlight detail. Given enough optical resolution, Piezography is capable of printing tack sharp at enlargement. With drum scanning of large format film, Piezography is capable of producing the absolute best examples of photographic printmaking. However, with any of today’s digital cameras, Piezography is capable of rendering superior output to any other system.
Getting Started Quick Links
Piezography is pretty simple to get working. It just requires you to follow certain steps to convert your printer.
Read about each Piezography ink:
CARBON
SELENIUM
NEUTRAL
WARM NEUTRAL
SPECIAL EDITION
PRO
What is the difference between K7, P2, K6, PiezoDN, and Pro?
How to Purchase:
-
Purchase your ink set and cartridges. (On this page you can filter by printer compatibility as Piezography ink type. Add cartridges to your cart afterwards if you don't see a kit that includes both carts and ink.)
-
When your ink and carts arrive, install your ink with the Cartridge instructions and Piezography Conversion instructions available from the "Support" menu above.
-
Download QuadtoneRIP and (if on MacOS) Print-Tool and install these required softwares.
-
Download Piezography Community Edition and install it.
-
Verify that your printer has Piezo ink installed correctly.
-
Print your first test image.
-
Make Art!
If you have trouble, always remember we are only a few seconds away by contacting us below or posting on our support forum.
Helpful Links:
-
Evaluating a Manual Nozzle Check to Determine the Heath of Your Printer
-
Flushing Epson Pro desktop model printers for long-term storage or ink switches.
More Options:
Supported Printers
For up-to-date information please view our supported printers page.
Supported Cartridges
The cartridges that are produced by Vermont PhotoInkjet and distributed by InkjetMall are specially designed cartridges mated with specially designed controller chips. Although all China made cartridges look-alike, they are actually quite dissimilar. The molds for the outside of these cartridges are often leased by companies who do not operate their own injection molding equipment, but rather lease time on larger production lines. The internal parts of these cartridges can be sourced from a very wide variety of suppliers. The quality of the welding (preferred) or gluing together of all the separate parts varies from one producer to another. Finally, the chips provided can come from a wide variety of sources.
InkjetMall encourages you to purchase our cartridges because they know that the cartridges perform at the standards required by the Piezography system. There are much cheaper alternatives available on eBay and other eCommerce sites. But, we can neither support them nor guarantee your success with the Piezography inks.
The problems manifest in inferior cartridges include leaking, venting, printer banding, damage to the pin readers or air supply system of the printer, and premature emptying of the ink supply. Beyond this, the actual metering of ink is critical in that banding can occur because of starvation and over inking is possible from carts that do not meter correctly. InkjetMall only sells cartridges that it is responsible for. It specifies the build list with a single factory which is responsible for the design of all the molds used in their injection molding. Further, the cartridges have been fully tested and InkjetMall is able to support them.
System Requirements
The system requirements for use of the Piezography system revolve around supported materials and supplies as well as the operating system of your PC or Mac. We have already indicated the printer models we support and the cartridges we provide. The use of Piezography inks is obvious.
The operating systems that are currently supported are Mac OS X 10.4.7 or greater (with the exception of 10.5 which is not supported because of problems internal to the color management system of 10.5). Windows 7 or greater.
The use of QuadTone RIP is a requirement. On Mac OS X 10.6 and greater, the use of QTR Print-Tool is also a requirement.
The Epson printer driver, though not used when printing, is required for the maintenance of the printer as well as the status updating of the remaining ink supplies.
Finally, the use of USB or i.p. addresses through TCIP or wireless are the only supported methods of connecting to the Epson printers. Firewire is not supported by QuadTone RIP.
QuadTone RIP (QTR) and Print-Tool
Piezography does not have an official affiliation with QuadTone RIP. However, its use is mandatory for Piezography. On many printer models we have supplied the Piezography media profiles directly to the author (Roy Harrington) to include in the download of his QTR software. For all updated and fresh printer models and profiles (curves) we are supplying them in the new Piezography package downloadable on our website.
QuadTone RIP (QTR) is a replacement printer driver for Epson printers. The Epson driver requires an RGB file that it then processes and prints to the many different color ink channels. It always expects an RGB image file and converts the color data into droplets of ink associated with the colors installed. The ABW driver uses color inks in association with its three blacks.
In order to print four or more shades of black ink, an independent ink channel RIP is required.
Unlike the RGB Epson driver, QTR is an independent channel driver. If the printer has 8 ink channels, QTR is operated as an 8 ink channel driver. If the printer has 6 channels or 11 channels, the QTR is operated as a 6 or 11 ink channel driver.
The QTR RIP allows independent control of each of the Epson ink channels with the use of special media profiles. QTR is designed to use QuadToneRIP curve descriptor files. But, Piezography does not use curve descriptor files. Instead, Piezography uses proprietary curves structure that is compiled into a .quad file. The .quad file directly controls how much ink is printed by each ink channel. The Piezography curves are quite different from any curve that you can make yourself.
When Apple released OS X 10.5 (Leopard), it began to change the way it allowed its users to use (and not use) color management. After many years as a stable professional printing platform, it suddenly began to silently (without the knowledge of the user) color manage image files. This destructive behavior occurred differently with each subsequent release (Snow Leopard, Lion, Mountain Lion, Mavericks, and now Yosemite). Prior to their naming their OS upgrades by animals or locations, Apple did not provide internal color management. Adobe could be counted on for providing professional color management of image files.
Because Piezography requires a stable operating system with No Color Management applied to grayscale files, the use of QTR Print-Tool is now mandatory.
QTRgui operates on the Windows platform as an independent application. On OS X, Print-Tool operates as an independent application. Both are used to print files to Roy Harrington’s QuadToneRIP (QTR).
Images may be edited in any imaging application that can save a TIFF format file. In addition to TIFF files, Print-Tool can also print JPG and PSD files (without layers).
Of the two platforms, the OS X Print-Tool has the most bells and whistles. Where QTRgui allows print only one image at a time, Print-Tool is a complex image layout program allowing multiple images of varying resolutions to be laid out for a single print run.There are not output quality differences between them. Each is capable of producing the same Piezography quality output.
On the Windows application, QTRgui prints directly to QTR. All of the QTR variables are selected in QTRgui interface. On Mac OS X, only some of the variables are selected in Print-Tool. When the print job is handed off to QTR, the user must select the remaining variables.
QTR has published manuals for the use of both of these interfaces. However, the workflow for non-Piezography QTR users is quite different than that of Piezography QTR users. Piezography is incompatible with standard QTR workflow. We do not encourage you to read the QTR manuals for workflow. They are useful for installation, instructions for making Soft Proof ICCs, and as a guide if you wish to try your hand at Curve making. The QTR curves that you can make yourself are quite different than the .quad curves that Piezography provides.
While we do not discourage you from experimenting, it is simply not possible for your to produce the same quality as the Piezography curves. The reason is that we use a different curve structure that allows for increased resolution, smoothness, and total ink limits. The QTR curves tool does not produce the same curves structure. Piezography curves are a critical component in using QuadTone RIP in order to produce the Piezography effect.
The Five Piezography Ink Hues
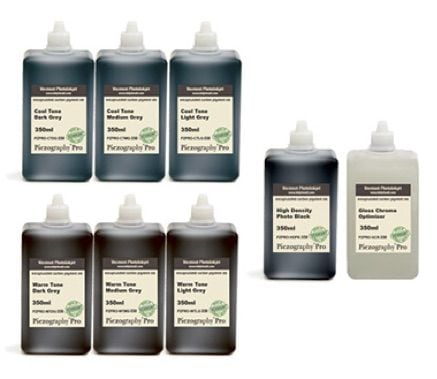
Piezography K7 inks are available in seven gradated shades from Shade 1 black to the lightest gray Shade 7. Piezography K6 and Piezography 2 ink sets use only six shades. The seventh shade is dropped from these two ink sets. The CLASSIC Piezography Digital Negative systems use shades 2, 2.5, 3, 4.5 and 5. Shades 2.5 and 4.5 are unique to the classic Piezography Digital Negative ink sets. The NEW PiezoDN (upgraded digital negative) system simply uses glossy Shades 1 through 6 and Gloss Optimizer. The new Piezography PRO uses new ND Matte and Photo blacks, along with three shades of unique L values different than the K7/K6 and digital negative ink shades. The Piezography PRO ink shades are Dark Gray, Medium Gray, and Light Gray (as well as Very Light Gray for the 4900, 7900 and 9900 11-channel printers). In order to produce the Piezography effect with four ink shades to minimize noise and maximize resolution and depth, the L value of each of the shades must be precisely controlled to a very small tolerance.
Piezography K7, K6 and P2 ink sets are available in five different tones: Carbon, Neutral, Selenium, Special Edition, and Warm Neutral. Piezography ink shades are not dilutions of a mother concentrate. They are each individually formulated. They are amongst the most sophisticated formulations in the world.
Piezography pigment is ground to exceptional small diameters and “polished” in a proprietary process. This expensive process creates a smooth pigment particle rather than a rough particle as found in other ink formulations (including the OEM). The pigment particle is encapsulated in a micro-thin layer of acrylic co-polymer. Encapsulation is only available from Vermont PhotoInkjet, Epson and HP. The effect of encapsulation is to isolate the pigment particles static electrical charge to prevent attraction with other pigment particles. The main benefit is non-clogging performance.
Piezography inks are filtered five times by osmosis resulting in a very narrow distribution band of particle sizes. This expensive process produces a very uniform layer when printed and is partly responsible for the zero-metamerism of Piezography inks. It is done, however, to produce an extremely uniform reflection of light back to the viewer. Piezography inks are unique in their ability to absorb and reflect light in such a way as to create the illusion of depth.
Which Ink Set is Right for Me?
The inks are sold in sets according to the type of printer and the amount of ink positions it has. The other variable is whether you prefer a matte only set, a glossy/baryta only set, or both matte and glossy set, a classic digital negative only set, or a Piezography 2 ink set to automate black switching on 8 ink printers, or a P2 CLASSIC digital negative set (for matte only K6 printing and digital negatives on 8 ink printers), or the NEW Piezography digital negative set (which can print regular K6 on matte or gloss papers, as well as digital negatives on film- controlled by different curves), or the new Piezography PRO system, which can do unlimited blending and/or split toning with an installation of two quadblack ink sets all independently controlled in highlights, mid-tones and shadows.
In each case, Piezography systems are fully turn-key. You just add a printer and paper. No need to learn complicated workflow or QTR curves design. We've done it all for you in a way that you could not yourself. Not a judgment. It's a statement of fact based upon the proprietary Piezography tools we designed to produce the media profiles at the heart of our systems. They enable you to print at the highest possible standard.
Here is a run down of the ink set layouts. Some printer models are eligible for several different types of ink sets. The ink sets are available in five different tones (Carbon, Neutral, Selenium, Special Edition, and Warm Neutral). If you prefer to have an ink set that allows you to blend the tones and make complicated split tones - you will need the new Piezography PRO™ system.
Piezography K6 Matte only EPSON 1400 / 1430
With this printer you are limited to a matte only set of inks in six shades from 1-6. We call a six shaded ink set Piezography K6. A Piezography K6 set of inks can only be printed on matte papers because there are not enough slots for the GO which is a requirement for non-matte papers. If you do choose to put PK ink and print gloss, you will need to have a separate dedicated GO printer or other gloss optimizer solution available.

Matte Black shade 1, shade 2, shade 3, shade 4, shade 5, shade 6
Piezography K7 Matte only EPSON 2200, 7600, 9600
These are seven ink printers and are no longer supported by EPSON with parts, etc. But they make excellent Piezography printers for matte only printing. If and when you lose ink channels, don't junk it! Have us custom configure the printer as your Piezography Gloss Overprint machine! Having 2 or more channels to print GO with is a superior solution.

Matte Black shade 1, shade 2, shade 3, shade 4, shade 5, shade 6, shade 7
Piezography K6 glossy only EPSON 2200, 7600, 9600
These are seven ink printers and are no longer supported by EPSON with parts, etc. But they make excellent Piezography printers for baryta/glossy only printing. In this case the ink set is reduced to 6 shades and the matte black is replaced with photo black and the Gloss Overprint (GO) is installed where shade 7 would normally be used.
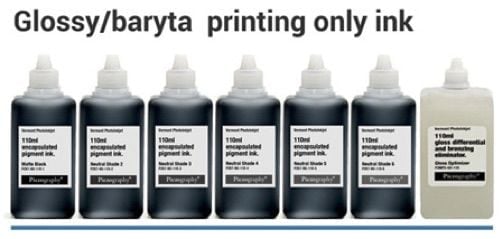
Photo Black shade 1, shade 2, shade 3, shade 4, shade 5, shade 6, GO
Piezography K7 matte with PiezoFlush EPSON 1800, 1900, 2400, 2880, R3000 & all PRO models.
These all have at least 8 ink slots and up to 11. But, if you only intend to print matte papers then we provide PiezoFlush for you to install into the unused ink channels so that the print heads do not dry out. But, we also offer a lot more options for these printers which include glossy, dig neg, etc... read on!

Matte Black shade 1, shade 2, shade 3, shade 4, shade 5, shade 6, shade 7, PiezoFlush
Piezography K7 matte / glossy
For all supported printers with nine ink slots or for eight ink slot printers that require black ink changes for printing matte black or photo black. The 1800, 1900, 2400, 2880, 4000, 4800, 4880, 7800/9800, 7880/9880 have 8 ink slots and require black ink changes by keeping two black cartridges. The R3000, 3800/3880 and 7890/9890 have both matte and photo black installed simultaneously.

Matte Black shade 1, Photo Black shade 1, shade 2, shade 3, shade 4, shade 5, shade 6, shade 7, GO
Piezography K7 matte / glossy
The EPSON 4900, 7900, 9900 have 11 ink slots. You can install matte and photo blacks and with two additional slots unused we provide PiezoFlush to keep them from drying out. (But you may wish to consider digital negative shades 2.5 and 4.5 to install in them.) Some of the 4900, 7900, 9900 printers have paper sensors that are defective and will stop the second overprint of GO prior to its completion. There are a variety of workarounds - but some printers will not work. Pre-test yours by trying a double print with the existing inks.

Matte Black shade 1, Photo Black shade 1, shade 2, shade 3, shade 4, shade 5, shade 6, shade 7, GO, PiezoFlush
Piezography 2 - K6 matte / glossy
Piezography 2 is a matte/glossy system designed for 8 slot printers in which the ink set is reduced from 7 shades to 6 shades and the Photo Black is installed in the Yellow position where shade 7 is normally installed. We produced a special set of “P2” media curves for QTR that enable you to print matte or glossy by just selecting the corresponding media curve. No need to deal with black ink changes. You can adapt this to the 2400, 2880, 4000, 4800, 4880, 7800/9800, 7880/9880 as these have only 8 ink slots.

Matte Black shade 1, Photo Black shade 1, shade 2, shade 3, shade 4, shade 5, shade 6, GO
PiezoDN 2016 (Piezography Digital Negatives)
PiezoDN is a seven-ink set that uses Piezography PK1 (formally Warm Neutral 1) with Selenium shades 2, 3, 4, 5, 6 + Gloss Optimizer. This enables any 8-channel printer to print both Piezography prints as well as Digital Negatives.
PiezoDN is a different ink set than previous classic Piezography Digital Negative ink sets. In the past, there was a special shade 2.5 and shade 4.5 that were used. These two inks are no-longer used.
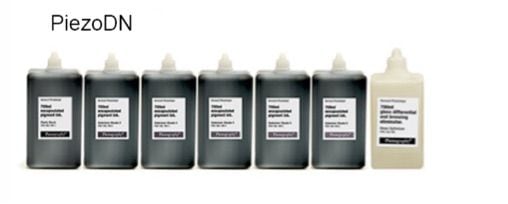
Shade PK1, SELENIUM: shade 2, shade 3, shade 4, shade 5, shade 6, Gloss Optimizer*
*for printers with only 6 channels, Gloss Optimizer is not used.
Piezography Pro - warm and cool matte / glossy split-tone
Piezography Pro is a completely new ink system, that produces unique tones by blending or split-toning warm and cool ink shades. The Pro system designed for printers with 8 or more channels, and can print on both matte and glossy papers, as well as print digital negatives. The Pro inks include new HD Matte and Photo blacks, along with three (or four) shades of warm and cool inks, and a new Gloss Chroma Overprint (GCO) for gloss printing. We produced a unique set of warm, cool and neutral “Pro” curves for a variety of matte and gloss papers. Gloss curves are designed to print GCO at the same time as inks, for one pass gloss printing.
Piezography Pro set 9 - matte / glossy

For Epson R3000, 3800, 3880, 7890 & 9890 printers, which have 8 printing channels but 9 cartridges, including Matte and Photo black, with an internal black ink change function.
HD Photo Black, HD Matte Black, Dark Gray Warm, Medium Gray Warm, Light Gray Warm, Dark Gray Cool, Medium Gray Cool, Light Gray Cool, GCO.
Piezography Pro set 11 - matte / glossy
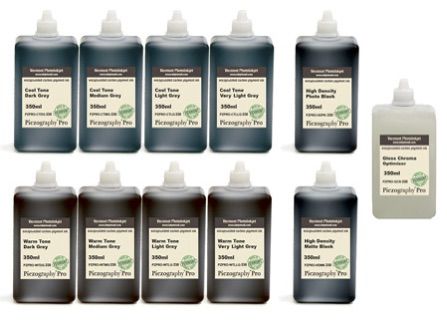 For Epson 4900, 7900 & 9900 printers, which have 10 printing channels but 11 cartridges, including Matte and Photo black, with an internal black ink change function.
HD Photo Black, HD Matte Black, Dark Gray Warm, Medium Gray Warm, Light Gray Warm, Very Light Gray Warm, Dark Gray Cool, Medium Gray Cool, Light Gray Cool, Very Light Gray Cool, GCO.
Piezography Pro set 8 - matte
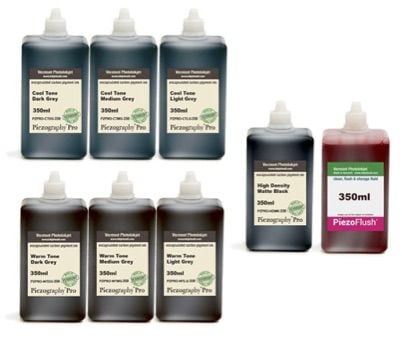 For Epson R1900, R2000, R2400, R2880, 4800, 4880, 7800, 9800, 7880 and 9880 printers; which have 8 channels, and need to manually switch black inks for matte or glossy printing.
To switch to gloss printing in the future, you will need a new black and light light black cartridge, along with HD-Photo Black and Gloss Chroma Optimizer to purge the K and LLK channels.
HD Matte Black, Dark Gray Warm, Medium Gray Warm, Light Gray Warm, Dark Gray Cool, Medium Gray Cool, Light Gray Cool and PiezoFlush.
Piezography Pro set 8 - glossy
 For Epson R1900, R2000, R2400, R2880, 4800, 4880, 7800, 9800, 7880 and 9880 printers; which have 8 channels, and need to manually switch black inks for matte or glossy printing.
To switch to matte printing in the future, you will need a new black cartridge, along with HD-Matte Black ink to purge the K channel.
HD Photo Black, Dark Gray Warm, Medium Gray Warm, Light Gray Warm, Dark Gray Cool, Medium Gray Cool, Light Gray Cool, GCO.
Piezography Curves
These are the heart and soul of the system. At the same time they are like silent partners. But, without them, you can not get the best out of the system.
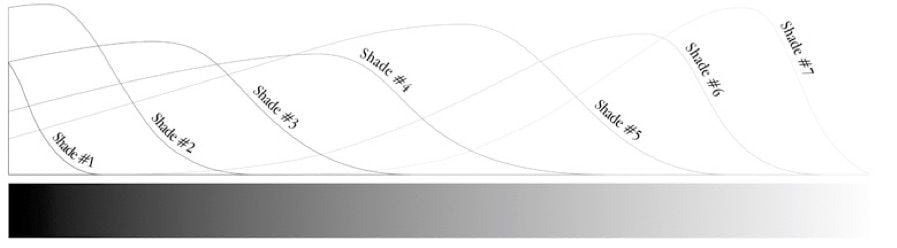
“Curves” are the QuadTone RIP name for media profiles. The QTR “Curve” is different than a Piezography “Curve” for QTR. The main differences are in the shape of the Piezography Curve. Actually, the entire architecture is quite different. Rather than use the predictability of bell shaped curves, we designed a curve that is more like an ocean wave where it rapidly advances and very slowly recedes. The slow receding allows us to form a very complex series of overlaps that ensure that the normal dithering of QTR is spaced so tightly that no paper remains unprinted. The end result is about 35-40% more ink is printed than if the dithering remained more open (or normal).
What we do inside the spaces between dithering dots that would normally remain unprinted is produce much higher resolution and promote depth in the ink layer. This is the “breath” of Piezography at extremely high resolution.
How these curves work are easily explained in the following diagram.
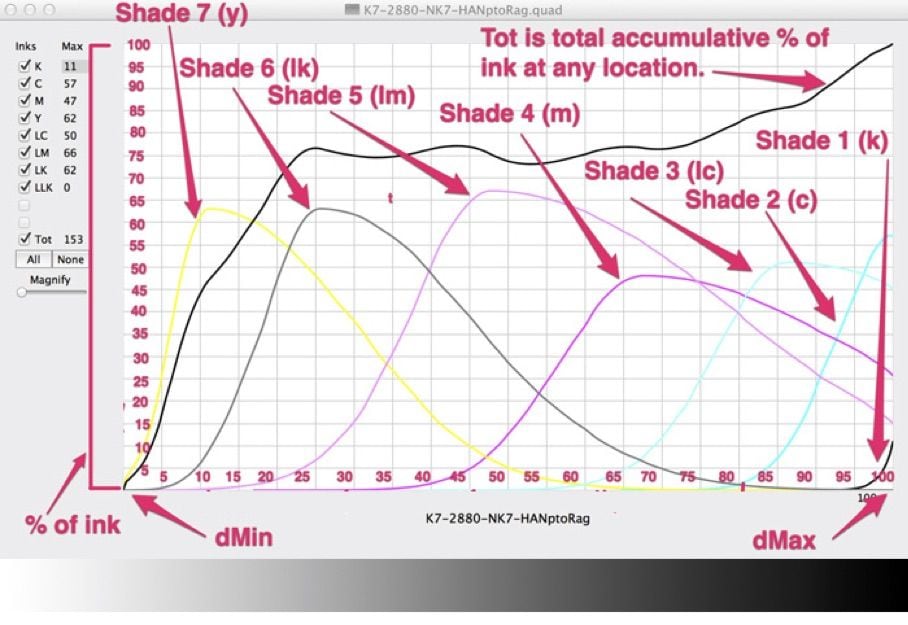
The above curve is showing how each of the color positions in the printer is used to print subsequently darker shades of gray until reaching black. From left to right each of the shades is responsible mainly for a small density range, but is used subsequently under other curves. Yellow representing shade 7 peaks at 11%. gray. It is used to print shades 1-10% at which time shade 6 in the light black position just begins to come in. As shade 6 begins to rapidly increase to a peak of 25% gray density, shade 7 (yellow) is on its way out. Shade 7 (yellow) stops printing entirely at 55% density. It is only providing support to shades 6, 5, and 4.
Shade 5 begins just as shade 6 is peaking, and so on and so forth. You are probably surprised to see how little of black shade 1 is printed over shade 2 (the very very dark gray). But, dMax is actually made of shades 1, 2, 3, and 4.
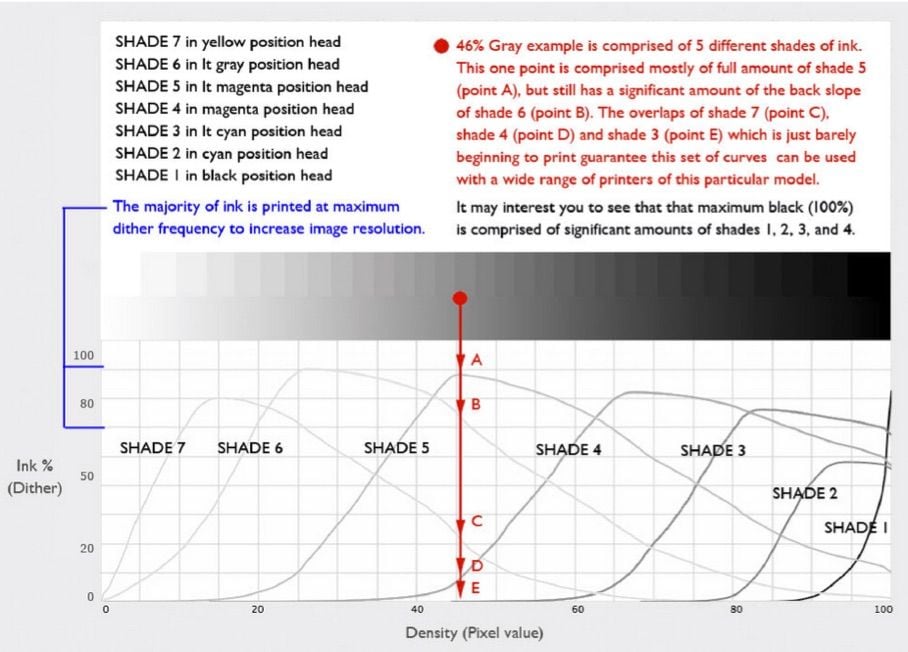
By using these very long back slopes, Piezography ensures that the entire image is filled with ink, rather than a combination of ink and paper spots. In this - we use more ink - but we gain tremendously in resolution as well as depth.
The Piezography profiler was first developed at Cone Editions Press about 2002 for Piezography BW ICC and converted for use to make .quad files.
How to Install and Delete Piezography & QuadtoneRIP (QTR) Curves
Windows:
Mac:
For the Mac, simply plug in your printer (by USB) and double click the install.command file in this curve folder that corresponds to your printer model. Eg: Install3880-HDP2.command will install all the curves in this folder and create a new printer in System Preferences called Quad3880-HDP2 If you have errors when installing curves for the first time, re-install QuadtoneRIP and then double click the install command again.
CURVE AND PRINTER REMOVAL OR REFRESH:
Mac: With Mac, there are TWO folder locations that QTR references for curves, so you will need to
1. /Applications/Piezography/Curves-HD/(Your Printer Model)
NOTE: With Mac users, you must uninstall your Quad printer model (in System Preferences> Printers & Scanners), then reinstall it using the install.command located in the same folder you removed curves from. You will also need to restart your printing application if it was open when installing or removing curves. This will show the modified curve list in QuadTone RIP.